Are you ready to make delicious, creamy ice cream right at home? Your KitchenAid Ice Cream Maker can turn simple ingredients into a frozen treat that’s perfect for any occasion.
But if you’re not sure how to use it or want to get the best results, you’re in the right place. This guide will walk you through every step, so you can enjoy homemade ice cream that tastes better than store-bought.
Keep reading, and soon you’ll be impressing your family and friends with your ice cream-making skills!
Choosing The Right Model
Choosing between a built-inice cream maker and attachmentsdepends on your kitchen setup. Built-in models have their own motor and work independently. Attachments need a compatible KitchenAid mixer to function.
Capacity matters. Smaller models hold about 1.5 quarts, ideal for families or small groups. Larger ones can make up to 2 quarts, perfect for parties or gatherings.
| Key Feature | What to Look For |
|---|---|
| Ease of Use | Simple controls and easy assembly |
| Freezing Time | Shorter time means faster treats |
| Cleaning | Parts that are dishwasher safe help |
| Durability | Sturdy materials last longer |

Credit: www.kitchenaid.com
Preparing The Ice Cream Maker
Freeze the ice cream maker bowl for at least 15 hours. This keeps it very cold and ready to freeze your ice cream. Do not skip this step; the bowl must be very cold.
Assemble the parts carefully. Attach the paddle inside the frozen bowl. Then, place the bowl into the machine base. Make sure all parts fit well and securely.
- Plug in the machine and turn it on.
- Pour your ice cream mix into the bowl while it spins.
- Let it churn until the ice cream thickens.
- Turn off the machine and remove the bowl.
Making Your Ice Cream Base
Choosing the right ingredients is keyfor creamy ice cream. Use fresh cream, milk, and sugar. Eggs can add richness but are optional. Keep the mixture smooth by stirring well.
Mix the base slowly to avoid lumps. Stir continuously until the sugar dissolves. Let the mixture chill in the fridge before using the ice cream maker. Cold base means better texture.
- Vanilla: Use vanilla extract or seeds from a pod.
- Chocolate: Add cocoa powder or melted chocolate.
- Fruit: Blend fresh or frozen fruits for natural flavor.
- Nutty: Mix in chopped nuts or nut butters.

Credit: www.amazon.com
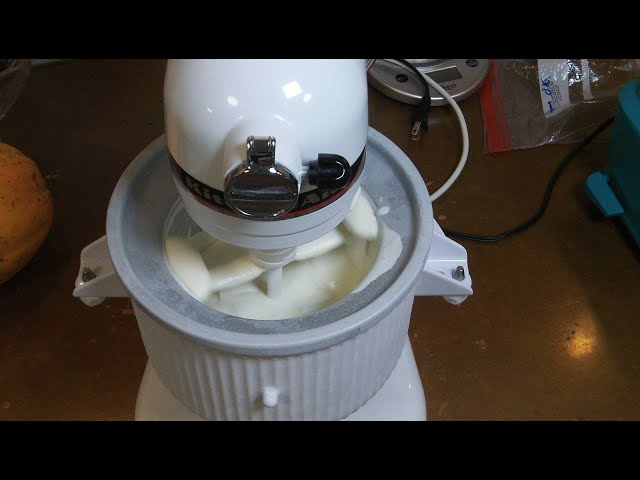
Operating The Machine
Plug in the Kitchenaid Ice Cream Makerand lock the bowl in place. Pour your ice cream mixture into the frozen bowl before starting. Turn the machine on to begin the churning process. The paddle will rotate slowly, mixing and freezing the mixture evenly.
Keep an eye on the mixture’s consistency. It should thicken and look creamy within 20-30 minutes. Stop the machine when the ice cream reaches a soft-serve texture. If it is too runny, churn for a few more minutes.
| Common Issue | Possible Cause | Solution |
|---|---|---|
| Machine not turning on | Power cord not plugged in | Check and plug in securely |
| Ice cream not freezing | Bowl not frozen enough | Freeze bowl for at least 15 hours |
| Mixture too runny | Churn time too short | Continue churning until thick |
Finishing And Serving
Finishing and serving homemade ice cream with a KitchenAid Ice Cream Maker is straightforward. Freeze the mixture until firm, then scoop into bowls. For added delight, top with your favorite fruits or nuts. Enjoy a delicious treat with family and friends, right from your kitchen.
Transferring The Ice Cream
Once the ice cream is ready, use a spatula to scoop it out. Be gentle to keep the texture smooth. Transfer it to a freezer-safe container. Make sure the container is clean and dry. Flatten the top with the spatula. This helps it freeze evenly. Cover with a lid or plastic wrap.Storing Tips
Store the ice cream in the coldest part of the freezer. This keeps it firm and fresh. Use a container with a tight lid to avoid freezer burn. Label the container with the date. Eat within two weeks for the best taste.Serving Suggestions
Serve the ice cream with your favorite toppings. Try chocolate syrup or fresh fruits. Sprinkles add fun and color. Offer it in cones or bowls. Serve right from the freezer to keep it cold. Enjoy your homemade treat! `
Credit: www.kitchenaid.com
Cleaning And Maintenance
Start by taking apart the ice cream maker carefully. Remove the bowl, dasher, and lid for easy cleaning. Avoid using sharp tools to disassemble parts.
Wash each component with warm water and mild soap. Use a soft sponge to avoid scratches. Rinse thoroughly and dry with a clean towel. Never put the motor base in water.
- Store all parts in a dry place to stop mold and smell.
- Keep the bowl in the freezer if you plan to use it soon.
- Cover the machine to keep dust away.
- Check parts regularly for cracks or damage.
Creative Recipe Ideas
Classic ice cream flavors are simple and always popular. Try vanilla, chocolate,or strawberryfor a smooth start. These flavors use basic ingredients like cream, sugar, and eggs.
For those who want vegan and dairy-freeoptions, coconut milk or almond milk work well. Sweeten with natural syrups or fruits. These choices keep the ice cream creamy without dairy.
- Mix-ins:chocolate chips, nuts, or cookie pieces add texture.
- Toppings:fresh fruits, caramel sauce, or sprinkles make ice cream fun.
- Try combining flavors with your favorite mix-ins for a unique treat.
Frequently Asked Questions
How Do I Prepare The Kitchenaid Ice Cream Maker?
Start by freezing the ice cream bowl for at least 15 hours. Attach the bowl and paddle to your Kitchenaid mixer. Pour your ice cream mixture into the bowl and turn on the mixer to start churning.
How Long Does Kitchenaid Ice Cream Take To Make?
The churning process usually takes between 20 to 30 minutes. It depends on the recipe and mixture consistency. Once the ice cream thickens, it’s ready to be transferred to the freezer for firming.
Can I Make Sorbet With Kitchenaid Ice Cream Maker?
Yes, you can make sorbet using the Kitchenaid ice cream maker. Just use a fruit-based sorbet mixture without dairy. The machine will churn it smoothly to a soft, refreshing texture.
How Do I Clean The Kitchenaid Ice Cream Maker?
Disassemble the ice cream bowl and paddle after use. Wash them with warm, soapy water and dry thoroughly. Avoid using abrasive cleaners to keep the bowl’s freezing properties intact.
Conclusion
Making ice cream with a KitchenAid ice cream maker is simple and fun. Follow the steps carefully to get the best results. Choose your favorite ingredients and enjoy fresh, homemade ice cream anytime. Cleaning the machine right after use helps keep it ready for the next batch.
With a little practice, you can create tasty treats for family and friends. Try different flavors and enjoy the process. Homemade ice cream tastes better and feels more rewarding. Give it a try and enjoy every scoop!


