Are you struggling with a leaky or faulty Moen kitchen faucet? Removing a single-handle Moen faucet might seem tricky at first, but with the right steps, you can do it yourself without calling a plumber.
In this guide, you’ll discover simple, clear instructions that make the process quick and hassle-free. By the end, you’ll feel confident handling your kitchen faucet like a pro. Keep reading to learn exactly how to remove your Moen faucet safely and easily.

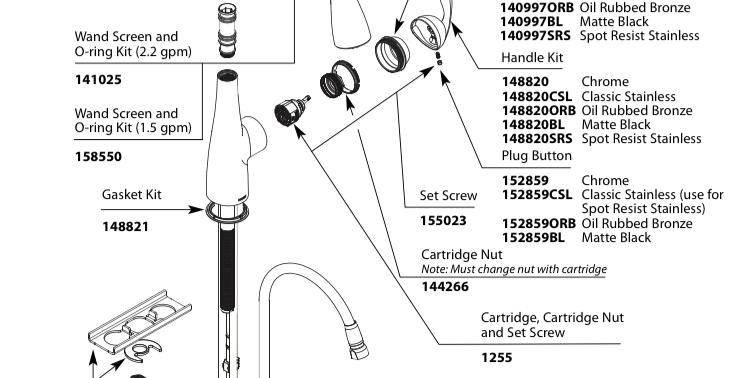
Credit: www.ebay.com
Tools Needed
Basic tools like an adjustable wrench, screwdriver, and pliers help remove a Moen kitchen faucet. A bucket and towel catch water spills during the process. Having these ready makes the job easier and cleaner.
- Adjustable wrenchto loosen nuts under the sink.
- Screwdriver(Phillips or flathead) for screws on the faucet.
- Allen wrenchto remove the handle set screw.
- Bucketto catch water drips.
- Towels or ragsfor cleaning spills.
- Pliersto grip and twist tight parts.
- Flashlightfor better visibility under the sink.

Credit: www.youtube.com
Turn Off Water Supply
Locate the water shut-off valves under the kitchen sink. These valves control the water flow to the faucet.
Turn the valves clockwise to close them. This action stops the water supply to your faucet.
Open the faucet handle to release any remaining water in the pipes. This prevents water spills during removal.
Check that no water flows from the faucet after closing the valves. This confirms the water is off.
If no shut-off valves exist, turn off the main water supply for the house. This stops water to all taps.
Prepare The Area
Turn off the water supply under the sink. This stops water flow during removal.
Clear the space under the sink. Remove items that block access to pipes.
Place a bucket or towels below the faucet. This catches any water left in pipes.
Have a wrench and screwdriver ready. These tools help loosen parts safely.
Wear gloves to protect your hands. The area might be slippery or sharp.
Remove Faucet Handle
Find the set screw on your Moen faucet handle. It is usually hidden. Look under the handle or behind a small cap. Some faucets have a cap that pops off. Use your fingers to remove it.
You need the right tool for the set screw. Most times, an Allen wrench works. Check the size before starting. Insert the wrench into the screw hole. Turn it counterclockwise to loosen. Do not force it. Turn gently to avoid damage.
Disconnect Water Lines
Turn off the water supply under the sink. Use a wrench to loosen the nuts on the water lines. Be careful not to damage the lines or fittings. Place a bucket or towel below to catch any water drips. Gently pull the water lines away from the faucet. Check the lines for any damage before reconnecting or replacing. Keep the nuts and washers in a safe place for reuse. This will help avoid leaks when you reconnect later. Take your time. Rushing can cause damage or spills.

Credit: www.reddit.com
Detach Faucet From Sink
Use a basin wrench to loosen the mounting nutsunder the sink. These nuts hold the faucet securely in place. Turn the wrench counterclockwise to free them.
Once the nuts are loose, carefully lift the faucet outfrom the top of the sink. Check for any remaining connections like water supply lines and detach them gently.
Keep a bucket or towel nearby to catch any water that might drip during removal. Place the faucet on a soft surface to avoid damage.
Clean Sink Surface
Start by clearing the area around the sink. Remove any dishes or clutter. Use a soft cloth and warm water to wipe the sink surface. This removes dirt and grime that can cause slipping or damage. Avoid harsh cleaners that can harm the sink finish. Dry the sink with a clean towel to prevent water spots. Check for any soap scum or mineral deposits. A mild vinegar solution can help remove these spots. Clean the faucet base gently to avoid scratches. Keeping the sink surface clean helps the faucet removal process go smoothly and safely.
Install New Faucet Tips
Make sure to turn off the water supply before starting the installation. Check that all parts are included in the package. Use a basin wrench to tighten hard-to-reach nuts under the sink. Apply plumber’s tape on threaded connections to prevent leaks. Test for leaks after connecting water lines. Clean the sink surface before placing the new faucet. Align the faucet properly to avoid uneven installation. Hand tighten nuts first, then use tools for a secure fit. Avoid over-tightening to protect parts from damage. Keep a bucket handy to catch any water drips. Follow the manufacturer’s instructions for best results.
Frequently Asked Questions
How Do I Turn Off Water Before Removing Moen Faucet?
Locate the shut-off valves under the sink. Turn both valves clockwise to close them. This stops water flow, preventing leaks during faucet removal.
What Tools Are Needed To Remove Moen Kitchen Faucet?
You need an adjustable wrench, basin wrench, and pliers. A flashlight helps to see tight spaces. Keep a bucket handy for water drips.
How To Disconnect Water Supply Lines Safely?
Use an adjustable wrench to loosen the supply line nuts. Turn counterclockwise gently. Be ready with a towel to catch any residual water.
Can I Reuse The Old Moen Faucet Parts?
Reusing parts depends on their condition. Inspect for wear or damage. Replace washers and O-rings for a secure fit and leak prevention.
Conclusion
Removing a single handle Moen kitchen faucet is not hard. Follow each step with care and take your time. Turn off the water first to avoid leaks. Use the right tools to loosen the parts safely. Keep all pieces organized for easy reassembly or replacement.
This task saves money and helps you learn basic plumbing. Soon, your kitchen will look fresh and work well. Try it yourself and gain confidence for future repairs. Simple tasks like this build useful skills every homeowner needs.


