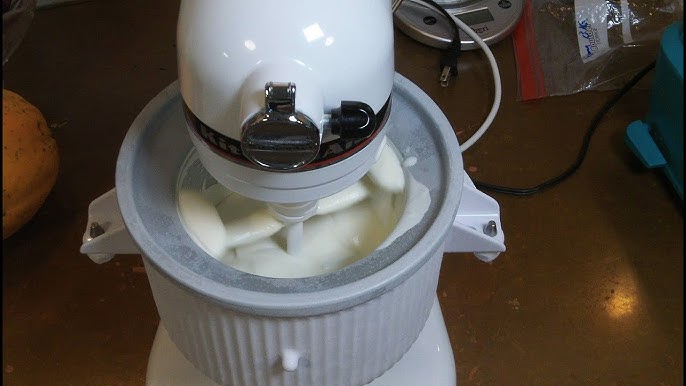
Craving homemade ice cream but don’t want to buy a separate machine? What if you could make creamy, delicious ice cream right in your KitchenAid mixer?
Yes, you heard that right. With just a few simple steps and ingredients, your KitchenAid can become the secret weapon for perfect ice cream every time. Imagine the satisfaction of enjoying fresh, custom flavors crafted by you, without any hassle.
Keep reading, and you’ll discover exactly how to turn your mixer into an ice cream maker and impress everyone with your tasty creations.

Credit: www.youtube.com
Choosing The Right Ingredients
Choose fresh dairylike whole milk or heavy cream for rich ice cream. Fresh dairy gives a smooth and creamy texture. Avoid low-fat or skim milk as they make ice cream icy.
Flavor add-insmake your ice cream special. Pick fruits, nuts, chocolate chips, or vanilla extract. Chop or mash fruits for better mixing. Nuts add crunch and chocolate chips add sweetness.
Sweetenershelp balance flavors. Use white sugar for classic taste. Try honey or maple syrup for a natural twist. Remember, too much sweetener can hide other flavors.

Credit: www.kitchenaid.ca
Preparing The Ice Cream Base
Start by pouring heavy creamand whole milkinto the Kitchenaid mixer bowl. Use the paddle attachment for gentle mixing. This helps blend the liquids evenly.
Next, slowly add granulated sugarto the cream and milk mixture. Stir well until the sugar dissolves completely. Add vanilla extractor any other flavorings you like. This step gives your ice cream its sweet and rich taste.
Chill the mixture in the refrigerator for at least 2 hours. Cold mixture freezes better and creates smooth ice cream. Make sure to cover the bowl with plastic wrap to keep it fresh.
Setting Up The Kitchenaid Mixer
Attach the ice cream maker bowl to your KitchenAid mixer securely. Fit the dasher paddle inside the bowl before locking it in place. Ensure the mixer is stable on a flat surface for smooth operation.
Attaching The Ice Cream Maker Bowl
Ensure the mixer is unplugged before starting. Place the ice cream maker bowl on the mixer. Turn it until it locks into place. It’s important to hear the click. This means it’s secure.Freezing The Bowl Properly
The bowl needs to be frozen well. Place it in the freezer for at least 15 hours. Ensure the freezer is set to the coldest setting. This helps in making the ice cream smooth.Choosing The Right Mixer Speed
Select a low speed for mixing. This helps the mixture blend well. Avoid high speeds. High speeds can cause spills. Always keep an eye on the mixing process. `Churning The Ice Cream
Pour the ice cream basegently into the chilled mixing bowl. Make sure the bowl is cold for the best results. Secure the bowl to the mixer and attach the paddle. Start the mixer on the recommended speed to begin churning.
Keep an eye on the texture. It should become thick and creamy after about 20-30 minutes. The ice cream will start to pull away from the sides of the bowl.
- Add mix-inslike chocolate chips or fruit in the last 5 minutes of churning.
- Do not add mix-ins too early to avoid breaking the texture.
- Stop the mixer once the ice cream reaches a soft-serve consistency.
Freezing And Serving Tips
Transfer ice cream to a cold, airtight containerfor best results. This helps keep it fresh and stops ice crystals from forming. Press a piece of parchment paper on the surface to avoid freezer burn.
For a smooth texture, let the ice cream sit at room temperature for 5 minutes before serving. This softens it slightly and makes scooping easier. Avoid leaving it out too long to prevent melting.
Try these ideas to serve ice cream in fun ways:
- Spoon into waffle cones for a classic treat.
- Top with fresh fruit or sprinkles for extra flavor.
- Make ice cream sandwiches using cookies or brownies.
- Blend with milk for a quick milkshake.
- Serve in small bowls with a drizzle of chocolate syrup.
Troubleshooting Common Issues
Soft ice creamcan happen if the mixture is too warm. Chill the bowl and ingredients well before use. The ice cream should firm up in the freezer after mixing for a few hours.
Ice crystalsform when ice cream is not stored properly. Keep ice cream in an airtight container. Press plastic wrap directly on the surface before sealing. Freeze quickly to avoid large crystals.
| Maintenance Tip | Why It Helps |
|---|---|
| Clean the mixing bowl and paddle after each use | Prevents build-up and keeps the machine working smoothly |
| Check for cracks or damage in the bowl | Ensures proper freezing and prevents leaks |
| Store the bowl in the freezer for at least 24 hours before use | Helps the mixture freeze faster and better |

Credit: www.youtube.com
Frequently Asked Questions
How Do I Use A Kitchenaid Mixer To Make Ice Cream?
Attach the ice cream maker bowl to your KitchenAid mixer. Chill the bowl for 15 hours. Pour the ice cream mixture into the bowl. Mix on low speed until thickened. Freeze afterward for firmer texture.
What Ingredients Are Needed For Kitchenaid Ice Cream?
Common ingredients include heavy cream, milk, sugar, and flavorings. Use fresh, high-quality ingredients for best taste. Adjust sugar based on sweetness preference. Optional add-ins include vanilla extract or fruit purees.
How Long Does Ice Cream Take To Churn In Kitchenaid?
Churning usually takes 20 to 30 minutes. Mix until the ice cream thickens and softens. Avoid over-churning to prevent ice crystals. Freeze after churning for 2 to 4 hours to firm up.
Can I Make Dairy-free Ice Cream With Kitchenaid?
Yes, use coconut milk, almond milk, or soy milk. Substitute cream with plant-based alternatives. Ensure the mixture is well-chilled before churning. Follow the same churning process for creamy results.
Conclusion
Making ice cream with a KitchenAid mixer is simple and fun. You only need a few ingredients and the right attachments. Mixing and freezing happen in one machine. This method saves time and effort. You can create many flavors at home.
Kids and adults both enjoy the process. Try your favorite recipes and enjoy fresh ice cream anytime. Homemade treats taste better and feel special. Give it a try and enjoy every scoop!





