Imagine the joy of a sunlit kitchen where every glance out the window inspires your culinary creations. But what happens when your kitchen sink, nestled perfectly under that window, creates venting challenges?
You might wonder how to manage this without compromising your kitchen’s aesthetic or functionality. This is where you come in—empowered to transform your kitchen space with smart solutions. Whether you’re planning a remodel or tackling a DIY project, understanding how to vent your kitchen sink under a window is crucial.
This guide will provide you with practical insights and easy steps to ensure your kitchen remains both beautiful and efficient. Dive in to discover how you can achieve a well-ventilated kitchen without sacrificing style or the stunning view outside your window.
Assessing Plumbing Layout
Positioning a kitchen sink under a window requires careful venting to ensure proper drainage. Utilize an air admittance valve to simplify installation and maintain airflow. This method prevents water from backing up, ensuring a smooth and efficient plumbing layout.
Identifying Existing Pipes
Check where the pipes are now. Find pipes under the sink. Note if they are old or new. Look for rust or leaks. Pipes should be in good shape. This helps to plan better. Good pipes mean fewer problems later.Considering Window Placement
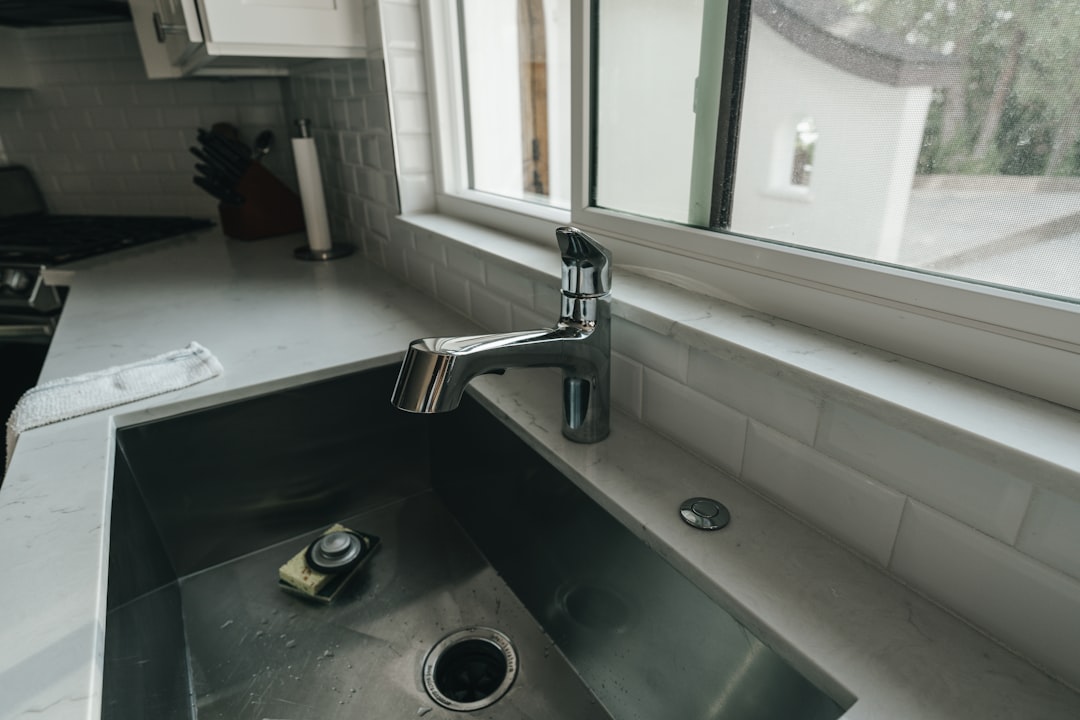
The window is a key part. Measure the height from floor to window. Think about how high the pipes can go. Pipes need room to vent. The window must not block them. Plan to keep pipes clear of the window. This will make venting easy. `Choosing The Right Vent Type
Choosing the right vent type for a kitchen sink under a window involves considering space and functionality. Opt for a loop vent to maintain efficient drainage without obstructing the view. This design offers a practical solution, ensuring proper airflow while complementing the kitchen layout.
Air Admittance Valves
Air Admittance Valves are helpful for small spaces. They allow air into the pipe. This prevents bad smells. They are easy to install. No need to cut through walls. They save space and time. The valve opens when water flows. It closes to block smells. This is a good option for many kitchens.
Traditional Venting Options
Traditional vents run through the wall. They need more space. They go outside to release air. They are reliable and strong. This option works for larger kitchens. Installation can be complex. Some people prefer this for long-term use. They require more planning and tools. Choose based on kitchen size and layout.
Gathering Necessary Tools
Venting a kitchen sink needs specific tools. Start with a wrenchfor loosening nuts. A pipe cutterhelps in cutting pipes. Plumber’s tapeseals connections. A plungercan clear clogs. PVC pipesare essential for proper drainage. Keep a buckethandy to catch water. Drain snakecan clear tough blockages. A pipe wrenchhelps tighten fittings. Ensure all tools are in good condition.
Safety is crucial while doing plumbing work. Wear safety gogglesto protect eyes. Use glovesto safeguard hands. A maskkeeps dust away. Ear protectionis necessary for loud noises. Keep first aid kitnearby for emergencies. Ensure proper ventilation in the work area. Non-slip shoesprevent accidents. Always work in a well-lit space.
Preparing The Work Area
Move all items from under the sink. This gives you more room to work. Use a flashlight to see better in dark corners. Organize items in a safe place. Make sure nothing blocks your path.
Lay down a plastic sheet or old towel. This catches dust and debris. Tape the edges to keep it in place. Use masking tape to cover nearby cabinets. This prevents scratches and damage. Keep a trash bag handy for cleanup.
Installing The Vent Pipe
First, find the spot for the vent pipe. Measure from the sink to the window. Mark the pipe where you need to cut. Use a pipe cutter for smooth edges. Ensure the pipe is cut straight. This helps in fitting the pipe easily. Always wear safety gloves during cutting.
Locate the existing plumbing lines. Attach the new pipe to these lines. Use pipe connectors for a tight fit. Ensure no gaps are present. Tighten the connectors well. This stops water leaks. Double-check the connections for safety. If unsure, ask an adult for help. It’s important to keep the area clean and dry.
Securing Vent To Wall
Brackets hold the vent securely. They keep it from moving. Use strong brackets for safety. Supports make the vent stable. They prevent wobbling. Choose good quality supports. This keeps the vent firm.
Align the vent carefully. It must be straight. Check with a level tool. Adjust until perfect. Misalignment causes issues. This can lead to leaks. Proper alignment avoids problems.
Testing For Proper Venting
Proper venting ensures efficient drainage and prevents odors. Position the vent pipe to maintain airflow. Make sure it’s accessible behind the sink without obstructing the window view.
Checking For Leaks
Check for leaks under the sink. Water should not drip or puddle. Use a dry cloth to wipe the pipes. Then, look for wet spots. Fix any leaks you find. Tighten loose connections carefully. Sometimes, you may need to replace a part. Make sure everything is snug and secure. Leaks can cause damage over time.
Ensuring Adequate Airflow
Airflow is important for your sink. Good airflow keeps water moving smoothly. Blocked vents can cause slow draining. Listen for gurgling noises. These noises mean poor venting. Ensure all vents are clear. Remove any blockages you see. You may need a plumber to help. Proper airflow prevents many problems.
Troubleshooting Common Issues
Venting a kitchen sink under a window involves strategic pipe placement to ensure proper airflow. Effective venting prevents unpleasant odors and supports efficient drainage. Use an air admittance valve or loop vent to accommodate space constraints.
Addressing Blockages
Blockages cause water to drain slowly. Use a plunger to clear clogs. Push the plunger up and down firmly. If the sink remains blocked, use a plumber’s snake. Insert the snake into the drain and twist. This helps remove stubborn debris. Check the pipe for grease or food scraps. Clean the pipes regularly to prevent future blockages.
Adjusting Vent Height
The vent height affects air flow. Ensure the vent is at least six inches above the trap. This prevents sewer gas from entering the home. Measure the vent height with a ruler. Adjust the vent if needed. Raise the vent to improve drainage. If unsure, consult a professional plumber for guidance.
Maintaining The Vent System
Position the vent system to avoid blocking the view. Opt for a low-profile vent under the window ledge. Ensure the vent connects to the main drainage smoothly, maintaining proper airflow and preventing blockages.
Regular Cleaning Tips
Keep your kitchen sink vent clean for best results. Use a soft brush to wipe dust and dirt. Check for clogs that block air flow. Pour warm water down the vent monthly. Avoid using harsh chemicals that harm pipes. Inspect the vent pipe for cracks or leaks. Replace damaged parts quickly to avoid problems.
Preventing Future Problems
Ensure the vent pipe stays clear at all times. Install a mesh cover to keep debris out. Check for any strange smells or noises. These can signal a vent issue. Keep heavy items away from the vent pipe. Heavy items can cause damage. Regular maintenance helps avoid costly repairs. Keep a vent cleaning schedule for best results.
Frequently Asked Questions
How Do I Vent A Kitchen Sink Under A Window?
To vent a sink under a window, use a loop vent. It helps with proper drainage.
Can A Kitchen Sink Vent Be Installed Horizontally?
Yes, a horizontal vent can work. Ensure it slopes slightly upwards for effective drainage.
What Is The Best Vent Type For A Window Sink?
A loop vent is best. It fits well under windows and ensures good air flow.
Do I Need A Professional To Vent A Sink?
It’s smart to hire a plumber. They ensure proper installation and compliance with local codes.
How High Should A Sink Vent Be?
The vent should be at least 6 inches above the overflow level of the sink.
Is A Vent Necessary For A Kitchen Sink?
Yes, vents prevent clogs and odors. They help maintain proper air pressure in pipes.
Conclusion
Venting a kitchen sink under a window can seem tricky. But with clear steps, it becomes manageable. Measure carefully before starting. Choose the right vent type for your setup. Follow local codes for safety and efficiency. Install with patience and precision.
A well-vented sink prevents odors and ensures smooth drainage. Always double-check your work for any leaks or issues. With these tips, your kitchen will stay fresh and functional. Remember, a little effort now saves trouble later. Happy plumbing!


