If you own a KitchenAid mixer, you know how reliable and powerful it is in your kitchen. But like any machine, it needs a little care to keep running smoothly.
Greasing your KitchenAid mixer is one of the best ways to make sure it stays in top shape. If you’ve ever wondered how to do this yourself, you’re in the right place. In this guide, you’ll discover simple steps to grease your mixer quickly and safely.
By the end, you’ll feel confident keeping your mixer working like new for years to come. Let’s get started!

Credit: www.reddit.com
Tools And Materials Needed
Greasing a KitchenAid mixer needs the right tools and materials. This helps the mixer work smoothly and last longer. Use food-grade greasemade for kitchen machines. Avoid regular grease that can harm the parts.
- Screwdriver set:To open the mixer casing.
- Soft cloth:To clean old grease and dirt.
- Brush or small spatula:For applying grease evenly.
- Food-grade grease:Safe for kitchen appliances.
- Gloves:Keep hands clean and protect from grease.
- Work surface cover:To avoid mess on your table.

Credit: www.amazon.com
Disassembling The Mixer
Start by unplugging the mixer for safety. Remove the bowl and attachments. Use a screwdriver to take off the screws on the side and bottom panels. Keep the screws in a safe place.
Gently lift the side panel to access the mixer gears. Be careful not to damage any wires inside. You may need to remove the top cover to see all parts clearly.
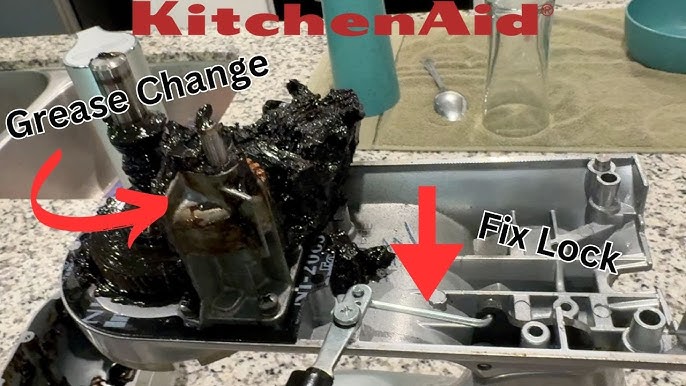
Check the condition of the gears and grease. Old grease looks dry or dark. Clean off old grease with a cloth or paper towel before applying new grease.
- Unplug the mixer
- Remove bowl and attachments
- Unscrew side and bottom panels
- Lift side panel carefully
- Remove top cover if needed
- Inspect gears and grease
- Clean old grease from gears
Cleaning Old Grease
Old grease can make the mixer work poorly. It needs to be cleaned out well. Use a soft cloth to wipe off any visible grease. A small brush helps reach tight spots. Apply a little bit of mild soap and warm water to remove stubborn grease. Avoid soaking the mixer parts in water. Dry the parts completely before adding new grease. Clean all the gears and moving parts carefully. Make sure no dirt or old grease stays inside. This helps the mixer run smooth and last longer.
Applying New Grease
First, unplug the mixer and remove the bowl and attachments. Open the mixer by removing the screws on the head. Take out the old grease carefully using a cloth. Clean the gears gently to remove all dirt and residue. Apply new grease evenly on the gears, making sure to cover all teeth. Use a grease that is safe for kitchen appliances. Do not use too much grease to avoid leaks. Reassemble the mixer by tightening the screws back. Test the mixer by turning it on briefly to spread the grease inside. Wipe off any extra grease from the outside. Regular greasing keeps the mixer running smoothly and quietly.
Reassembling And Testing
Carefully put all parts back in place. Make sure each piece fits snugly. Tighten screws without forcing them. Check the bowl and attachments are secure.
Test the mixer by turning it on at low speed. Listen for smooth sounds. No grinding or unusual noise should happen. If it runs well, try higher speeds briefly.
Observe the mixer during use. Look for any wobbling or shaking. Stop and check if something feels wrong.
Keep the work area clean and dry. Wipe off any excess grease. This prevents dirt buildup inside the mixer.

Credit: bobistheoilguy.com
Frequently Asked Questions
How Often Should I Grease My Kitchenaid Mixer?
Grease your KitchenAid mixer every 1 to 2 years or when it starts making noise.
What Type Of Grease Is Best For Kitchenaid Mixers?
Use high-quality food-grade grease to keep your mixer safe and working well.
Can I Grease My Kitchenaid Mixer Myself Safely?
Yes, you can grease it yourself by following the manual and using the right tools.
Conclusion
Keeping your KitchenAid mixer greased helps it work smoothly. Regular greasing stops parts from wearing out fast. It also keeps the mixer quiet and efficient. Use the right grease and follow the steps carefully. Avoid using too much grease to prevent damage.
Small efforts extend your mixer’s life and save repair costs. A well-greased mixer means better baking results every time. Take time to check and grease your mixer often. Easy to do, and worth the care. Your mixer will thank you with great performance.