A leaky single handle kitchen faucet can be more than just a minor annoyance. That constant drip can lead to higher water bills and potential water damage.
But don’t worry—you can fix it yourself without calling a plumber. Imagine saving money, time, and the satisfaction of handling it with your own hands. You might be asking, “How can I do this? ” Or “What tools do I need?
” You’re in the right place. This guide is crafted to give you simple, step-by-step instructions on how to stop that leak for good. Keep reading, because the solution is easier than you think, and by the end of this article, you’ll have the confidence to tackle it head-on, ensuring your kitchen stays dry and your wallet stays happy.

Credit: plumbing-united.com
Identifying The Leak Source
First, turn off the water supply under the sink. Use a flashlight to look for leaks. Check around the faucet handle. Also, inspect the base of the faucet. Water might drip from these places.
Next, feel the hoses under the sink. Are they wet? If yes, tighten the connections. Sometimes, hoses are the problem. Listen for any dripping sounds. This helps you find hidden leaks.
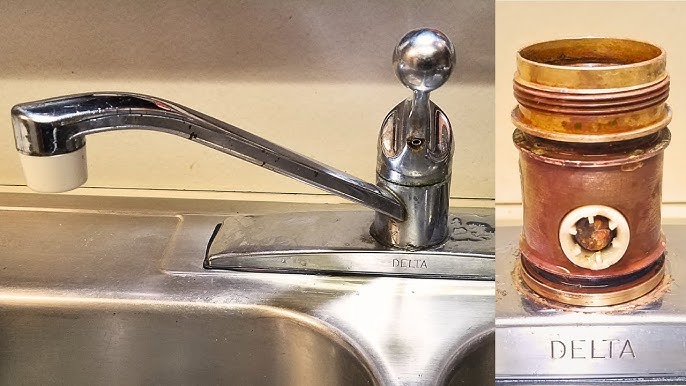
Examine the faucet spout. Is there water pooling here? This means the spout has a leak. The valve might also be the issue. Remove the handle to see inside. Look for worn-out parts.
Once you find the source, plan your fix. This saves time and effort. Identifying leaks early can prevent water damage.
Gathering Necessary Tools
Fixing a leaky faucet needs the right tools. Get an adjustable wrench. This helps to loosen tight nuts. A screwdriver is needed too. It helps remove screws easily. Plumber’s tape is important. It stops leaks from joints. Have a cloth handy to wipe water. A small bowl collects any dripping water. These tools make the job easier.
Turning Off Water Supply
Find the water valves under the sink. They control the water flow. Turn the valves clockwise to stop water. Use a towel to catch drips. This prevents mess. Make sure both hot and cold are off. Double-check the handles are tight. This ensures no leaks. If you can’t find the valves, check the main water supply. It’s often near the water meter. Turn it off if needed. Remember, water won’t flow now. You can safely fix the faucet. Be cautious when working with tools. Always check for leaks later. This keeps your kitchen dry.
Disassembling The Faucet
Turn off the water supply first. It’s important to prevent any mess. Locate the screw on the handle. Use a screwdriver to remove it. Take off the handle gently. You might see a cap underneath. Pry it off with a flat tool. Keep all parts safe in a bowl. You need them later.
Next, remove the collar or nut. It secures the cartridge. Use a wrench if needed. Be careful not to damage it. Pull out the cartridge. Check for any damage or dirt. Clean it with a cloth. Replace if it’s broken. Ensure everything is clean before reassembling.
Replacing Faulty Parts
First, turn off the water. Find the shut-off valves under the sink. Turn them clockwise to stop the water. Next, take off the faucet handle. Use a screwdriver to remove screws. Lift the handle up carefully. Look for the cartridge inside. This part often leaks. Pull it out with pliers. Be gentle. Take the old cartridge to a store. Get a new one that matches. Put the new cartridge in place. Push it down firmly.
Reattach the handle with screws. Turn the water back on. Check for leaks. Everything should be dry now. Enjoy a leak-free faucet!

Credit: www.youtube.com
Reassembling And Testing
Put the faucet parts back in place. Make sure all pieces fit snugly. Align each part as it was before. Tighten the screws gently. Do not overtighten them. Check the handle for smooth movement. Turn on the water supply next. Look for any leaks around the faucet. If it leaks, check the connections again. Ensure everything is secure.
Test the faucet by turning it on and off. Make sure the water flows properly. Adjust the handle to different positions. Check hot and cold water settings. Ensure there is no dripping when turned off. If it drips, tighten the faucet again. Congratulations, you fixed your leaky faucet!

Credit: www.youtube.com
Frequently Asked Questions
How Do I Identify A Leaky Faucet?
To identify a leaky faucet, look for water droplets or a constant drip from the spout. Listen for unusual noises when the faucet is turned off. Check under the sink for any signs of moisture or pooling water. Regular inspection can help spot leaks early and prevent damage.
What Tools Are Needed To Fix A Faucet Leak?
Basic tools needed include an adjustable wrench, screwdriver, and plumber’s tape. You may also need replacement parts like O-rings or cartridges. Having a towel handy is useful for cleaning up any water spills. Ensure you have all tools ready before starting the repair process.
Why Is My Kitchen Faucet Leaking?
A kitchen faucet might leak due to worn-out seals, damaged cartridges, or loose parts. Mineral deposits can also cause blockages and leaks. Regular maintenance and cleaning can help prevent these issues. Identifying the specific cause is essential for effective repair.
How Often Should Faucet Seals Be Replaced?
Faucet seals should be replaced every few years, depending on usage and water quality. Regular inspection can reveal wear and tear early. Hard water can accelerate seal degradation, necessitating more frequent replacements. Routine maintenance can extend the lifespan of your faucet seals.
Conclusion
Fixing a leaky single handle kitchen faucet can seem daunting. But, it’s manageable with the right steps. Start by identifying the leak’s source. Then, gather the necessary tools. Follow a clear, step-by-step guide to repair it. This saves water and prevents further damage.
Regular maintenance can help avoid future leaks. If unsure, consult a professional for help. A well-functioning faucet improves your kitchen experience. It also contributes to a more sustainable home. Remember, a small effort today can lead to big savings tomorrow.
Happy repairing!


