If you love homemade ice cream, you’re about to make your dessert game so much easier. Attaching an ice cream maker to your KitchenAid mixer lets you create creamy, delicious ice cream right at home without any hassle.
But if you’re not sure how to connect the two, it can feel confusing or tricky. Don’t worry—you’re in the right place. This guide will walk you through every step, so you can start whipping up your favorite flavors faster than ever.
Keep reading and get ready to turn your KitchenAid into the ultimate ice cream machine!

Credit: www.amazon.ca
Check Compatibility
Ensure the ice cream maker attachment fits your KitchenAid mixer model. Not all attachments work with every mixer type. Check the model numberon your mixer and compare it to the attachment’s compatibility list.
Most attachments fit mixers with a power hubon the front. This hub is where you connect tools like the ice cream maker. Older or smaller mixers may not have this hub.
Look for these key points:
- Attachment size:Matches the mixer’s hub size.
- Mixer power:Ensure your mixer has enough power to run the attachment.
- Model years:Some attachments only work with certain production years.
Reading the user manual or product description helps avoid mistakes. Proper matching makes the setup smooth and safe.
Gather Required Parts
Gather these essential partsbefore starting:
- Kitchenaid mixerwith a power hub
- Ice cream maker attachmentcompatible with your mixer model
- Drive shaftthat connects the mixer to the ice cream maker
- Freezer bowlthat has been frozen for 24 hours
- Plastic dasherthat mixes the ice cream inside the bowl
- Spatula or scraperto help remove the ice cream
Make sure all parts are clean and dry before assembly. Keep everything close to avoid losing pieces during setup.
Prepare The Mixer
Start by unplugging the KitchenAid mixer. Remove the bowl and any attachments. Clean the mixer hub to ensure no dust or food is left. Check that the mixer is on a flat surface for stability. Gather the ice cream maker parts needed for attachment. Make sure the mixer speed is set to “off” before attaching anything. Having a clear workspace helps prevent accidents. Prepare all tools required, such as a screwdriver if needed. Confirm the ice cream maker is clean and dry. This preparation makes the attachment process smooth and safe.
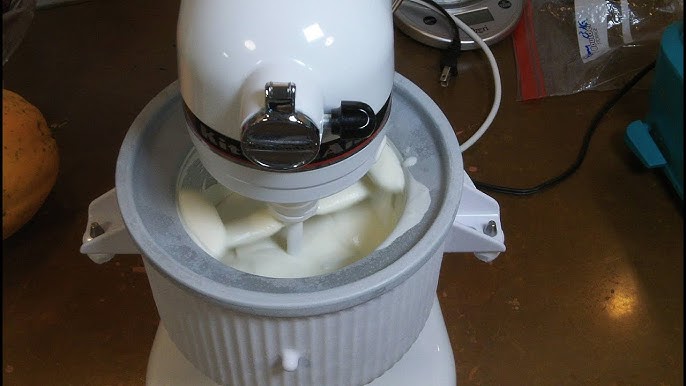
Attach The Ice Cream Maker
Make sure the mixer is unplugged before starting. Attach the ice cream maker’s bowl to the mixer base. Align the bowl so it fits snugly into the base. Lock the bowl in place by turning it clockwise until it stops. Attach the dasher (the mixing paddle) inside the bowl. Push the dasher down firmly onto the spindle. Attach the clear plastic lid on top of the bowl. The lid should click into place to prevent spills. Finally, connect the ice cream maker’s drive shaft to the mixer’s attachment hub. Plug in your mixer and turn it on to the recommended speed. Now, you are ready to make delicious ice cream.
Test And Start Churning
Make sure the ice cream bowl is fully frozen before starting. Attach the bowl securely to the mixer’s base. Lock the paddle onto the mixer’s attachment hub. Turn the mixer on to a low speed to begin churning.
Watch for smooth, even mixing. The ice cream should thicken within 20 to 30 minutes. Stop the mixer when the mixture looks creamy but firm. Avoid over-churning, as it can cause ice crystals.
- Check that the mixer is stable and won’t move during churning.
- Keep the machine covered to maintain cold temperature.
- Use fresh ingredients for best texture and flavor.

Credit: www.kitchenaid.com

Credit: www.aallyandsons.com
Frequently Asked Questions
How Do I Attach An Ice Cream Maker To A Kitchenaid Mixer?
Align the ice cream maker’s drive shaft with the mixer hub. Secure it by tightening the hub knob.
Can I Use Any Kitchenaid Mixer Model With The Ice Cream Maker?
Most KitchenAid stand mixers work, but check compatibility with your specific model before buying.
How Long Does It Take To Make Ice Cream Using This Attachment?
It usually takes 20-30 minutes to churn ice cream to a smooth, creamy texture.
Conclusion
Attaching your ice cream maker to a KitchenAid mixer is easy and quick. Follow each step carefully for the best fit. Make sure all parts click into place before starting. This setup helps you enjoy homemade ice cream anytime. No special skills needed, just a little patience.
Have fun creating your favorite frozen treats at home. Keep your mixer clean to ensure it works well. Now, you’re ready to make delicious ice cream with ease.


