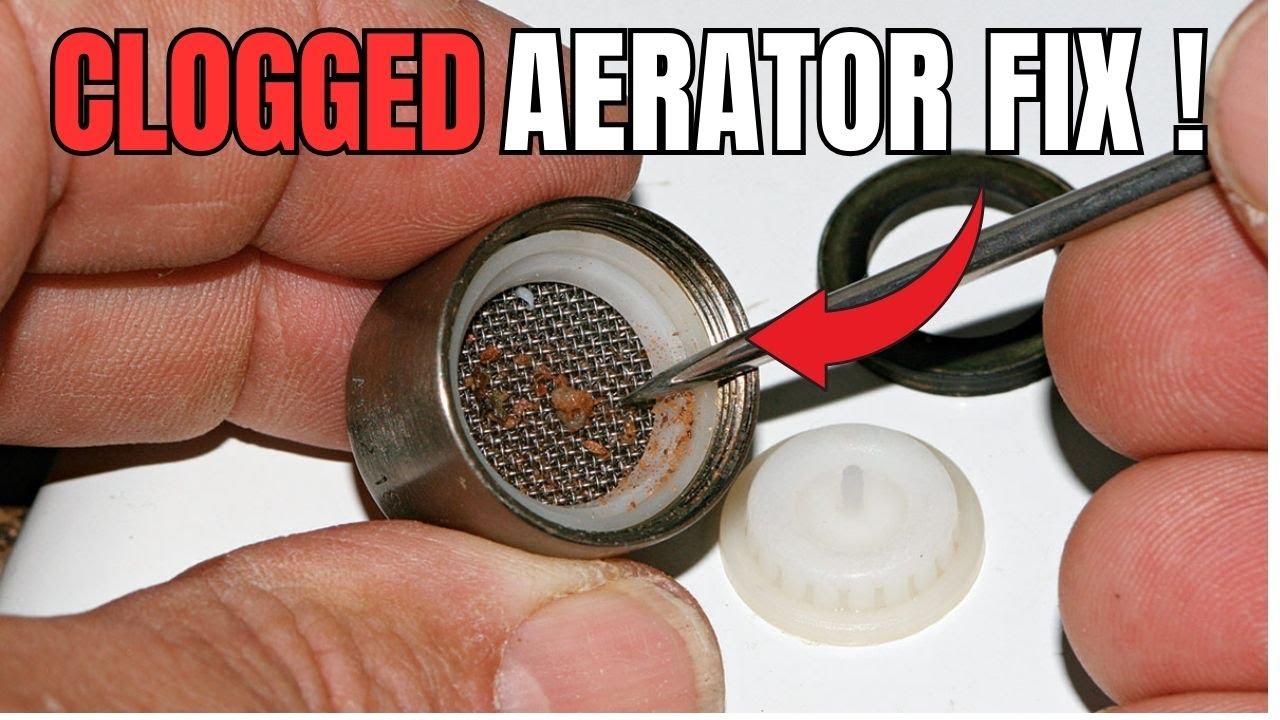
Is your kitchen faucet’s water flow looking weak or uneven? It might be time to clean your aerator.
This small, often overlooked part plays a big role in how your water streams out. When it gets clogged with minerals and debris, your faucet won’t work as well as it should. But don’t worry—you can fix this quickly and easily.
In this guide, you’ll learn simple steps to clean your kitchen faucet aerator and bring your water flow back to life. Keep reading, and you’ll save money, avoid costly repairs, and enjoy a stronger, cleaner stream from your faucet.
Tools Needed
Gathering the right toolsmakes cleaning the aerator easier and faster. Basic tools needed include:
- Adjustable wrenchor pliers to remove the aerator.
- Old toothbrushor small brush for scrubbing dirt.
- Bucketor bowl to catch water and hold parts.
- Clothto protect the faucet from scratches.
- White vinegarfor soaking the aerator and removing mineral buildup.
Having these items ready helps avoid delays. A clean workspace also improves safety.

Credit: www.yahoo.com
Removing The Aerator
Turn off the water supply to avoid spills. Look under the sink for the shutoff valves. Twist the handles clockwise until tight. This stops water flow to the faucet.
Hold the aerator at the faucet’s tip. Use your hand or a cloth for a better grip. Turn the aerator counterclockwise to unscrew it. If it’s tight, try pliers but protect the finish with a cloth.
Cleaning Methods
Soaking the aerator in vinegar helps remove hard water deposits. Use white vinegar and soak the aerator for 30 minutes to 1 hour. This softens mineral buildup and makes cleaning easier.
A small brush cleans inside the aerator well. Use an old toothbrush or a small wire brush to scrub gently. Focus on the mesh screen and small holes to remove dirt and debris.
Rinse the aerator under running water to wash away loosened grime. Make sure all vinegar and dirt are fully rinsed off. Dry the aerator before reattaching it to the faucet.

Credit: www.yahoo.com
Reinstalling The Aerator
Examine the aerator carefully for any cracksor worn-out parts. A damaged aerator may cause leaks or poor water flow. Replace it if you spot any issues.
Align the aerator with the faucet tip and screw it back gently. Avoid forcing it to prevent damage to the threads.
Tighten the aerator by hand until snug. Use a cloth and pliers for a final gentle turn, if needed. Do not over-tighten to avoid cracking.
Maintaining Aerator Cleanliness
Keeping the aerator clean helps maintain good water flowand prevents clogs. Cleaning it every few months keeps debris and minerals from building up. Use a small brush or soak the aerator in vinegar to remove dirt easily.
Water quality affects how often cleaning is needed. Hard water can cause more mineral buildup. Using a water softener or filter can help reduce deposits on the aerator.
| Water Quality | Effect on Aerator | Tip |
|---|---|---|
| Hard Water | Mineral buildup increases | Clean aerator more often |
| Soft Water | Less buildup | Clean aerator less often |
| Filtered Water | Fewer particles clogging | Use filters to protect aerator |

Credit: www.youtube.com
Troubleshooting Common Issues
Low water pressureoften happens because the aerator is clogged. Dirt, rust, and mineral deposits block water flow. Removing the aerator and soaking it in vinegar can help. Scrub gently with a brush to clear debris. Rinse well before reinstalling for better water flow.
Leaks around the aeratormay occur if the aerator is loose or the washer is worn out. Tighten the aerator by hand, but do not force it. If leaks continue, replace the rubber washer inside the aerator. Check the faucet threads for damage too. A new washer or aerator can stop leaks quickly.
Frequently Asked Questions
How Often Should I Clean My Kitchen Faucet Aerator?
Clean your kitchen faucet aerator every 3 to 6 months. Regular cleaning prevents clogs and maintains water flow. If water pressure drops, clean it sooner to avoid buildup of debris and minerals.
What Tools Do I Need To Clean An Aerator?
You need a wrench or pliers, a small brush, and vinegar. These tools help safely remove, clean, and soak the aerator parts. Soft brushes prevent damage to the screen.
Can Vinegar Remove Mineral Deposits From The Aerator?
Yes, vinegar effectively dissolves mineral deposits on aerators. Soak the aerator parts in vinegar for 30 minutes. This breaks down hard water buildup and restores water flow.
How Do I Reassemble The Aerator After Cleaning?
Rinse all parts with water before reassembling. Align the screen and washer correctly. Screw the aerator back onto the faucet hand-tight, then use a wrench to secure it gently.
Conclusion
Cleaning the kitchen faucet aerator is simple and essential. It ensures better water flow and quality. Regular maintenance prevents clogs and extends faucet life. Follow the steps shared for an effective cleaning process. You’ll notice the difference in water pressure immediately.
Cleaner water means a healthier home. It’s a quick task with big benefits. Keep your tools handy for next time. Remember, a clean aerator saves time and money. Enjoy a smoothly running kitchen without hassle. Happy cleaning!





