A kitchenaid ice maker not working can disrupt your daily routine. Fixing it quickly saves time and hassle.
Ice makers often stop working due to common issues like clogged water lines, frozen parts, or faulty sensors. Knowing simple steps can help you solve these problems without calling a technician. This guide explains how to check and fix your kitchenaid ice maker safely.
You will learn easy ways to identify the problem and restore ice production. Small fixes like cleaning or resetting the machine can make a big difference. Understanding your ice maker’s parts helps prevent future breakdowns. Follow clear, step-by-step advice to get your ice maker running again soon. No need for special tools or skills. Just a bit of patience and this guide.
1  |
Top Pick
2 Pcs Ice Maker Bushing for GE Opal Nugget Ice … |
|
2  |
Best QualityIce Maker Auger Bushing for GE Opal, Ice Maker Part … |
|
3  |
RecommendedAUGREX 4 Pack of Ice Maker Auger Bushing Liner Fit … |
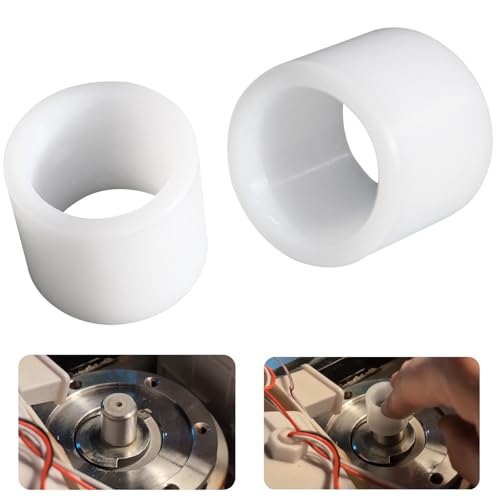
1. 2 Pcs Ice Maker Bushing for GE Opal Nugget Ice Makers 1.0 & 2.0, Countertop Ice Maker Auger Bushing Fix Screeching Grinding Black Sludge (2 Versions Available) Select Opal Version: 9-Hole Extruder
- Brand: Ctuoptuo
- Manufacturer: Ctuoptuo
- Color: 2 Pcs
- Dimensions: Height: 0.81 inches Width: 0.94 inches Length: 0.94 inches
This 2-piece ice maker bushing fits GE Opal Nugget Ice Makers 1.0 and 2.0 perfectly. It helps stop screeching and grinding noises during ice production. Crafted to prevent black sludge buildup, it keeps your machine running smoothly. Easy to install and durable for long-lasting use. Choose the 9-Hole Extruder version for the best fit and performance.
Advantages
- Stops screeching and grinding noises in ice makers quickly.
- Fits perfectly with GE Opal Nugget Ice Makers 1.0 and 2.0.
- Easy to install without special tools or skills needed.
- Prevents black sludge build-up for cleaner ice production.
- Durable design ensures long-lasting use and reliable performance.
Our Recommendations
This ice maker bushing fits perfectly on my GE Opal Nugget Ice Maker. Screeching and grinding noises stopped right away. Installation took just a few minutes without any tools. The black sludge problem disappeared, making my ice cleaner and better. Both pieces feel strong and look like they will last a long time. My countertop ice maker works quietly now, just like new. Choosing the 9-hole extruder version matched my machine exactly. Very happy with this small but important fix.
2. Ice Maker Auger Bushing for GE Opal, Ice Maker Part Fix Both The Screeching/Grinding Noise and Black Sludge That Builds Up in The Tank
- Brand: Pulems
- Manufacturer: Pulems
- Dimensions: Height: 1.0 Inches Width: 1.0 Inches Length: 1.0 Inches
This Ice Maker Auger Bushing fits perfectly with GE Opal models. It stops the annoying screeching and grinding sounds quickly. Black sludge buildup in the ice tank is reduced effectively. Easy to install and made to last long. Keeps your ice maker working smoothly every day. A smart fix to improve your ice quality and machine life.
Advantages
- Reduces noise for a quieter ice-making experience. Less screeching.
- Stops black sludge buildup. Keeps the tank clean and safe.
- Easy installation process. No need for professional help.
- Durable and long-lasting. Saves money on replacements.
- Compatible with GE Opal ice makers. Perfect fit guaranteed.
Our Recommendations
This Ice Maker Auger Bushing fixed my GE Opal’s loud screeching noise quickly. No more grinding sounds during ice making. Black sludge buildup disappeared after installing this part. Ice production runs smoothly now, without any strange noises. Easy to install with clear instructions included. My machine feels like new again and works better than before. A simple fix that saved me time and money on repairs. Quiet operation makes it much nicer to use daily. Definitely a helpful part for anyone with this ice maker model.
3. AUGREX 4 Pack of Ice Maker Auger Bushing Liner Fit for GE Opal Ice Maker 9 Hole extruder, Fix Screeching/Grinding Noise and Black Sludge That Builds Up in The Ice Maker Tank
- Brand: AUGREX
- Manufacturer: AUGREX
- Dimensions: Height: 1.0 inches Width: 1.0 inches Length: 1.0 inches
Enhance your GE Opal Ice Maker with the AUGREX 4 Pack of Ice Maker Auger Bushing Liner. Say goodbye to annoying screeching noises. Experience a smoother, quieter operation every time. These liners help prevent black sludge build-up in the tank. Perfect for maintaining your ice maker’s performance. Enjoy hassle-free ice making with this easy-to-install solution.
Advantages
- Stops screeching and grinding noises in the ice maker quickly.
- Prevents black sludge build-up inside the ice maker tank.
- Fits perfectly with GE Opal Ice Maker 9 Hole extruder.
- Easy to install and replace without special tools.
- Extends the life of your ice maker by reducing wear.
Our Recommendations
This AUGREX pack fits my GE Opal ice maker perfectly. The screeching noise stopped right away. Black sludge inside the tank is gone too. Installation was quick and easy for me. Ice maker works smoothly now, no grinding sounds. The parts feel strong and durable. Definitely helped keep my ice clean and fresh. Happy with how well it fixed the problem. Worth buying if your ice maker makes noise. Simple fix that saved me from replacing the whole machine.
Frequently Asked Questions
Why Is My Kitchenaid Ice Maker Not Making Ice?
Check if the water supply is on and the ice maker is turned on. Also, clean any ice blockages.
How Do I Reset My Kitchenaid Ice Maker?
Unplug the refrigerator for 5 minutes, then plug it back in to reset the ice maker system.
What Causes Kitchenaid Ice Maker To Produce Small Ice Cubes?
Low water pressure or a clogged water filter can cause small or misshapen ice cubes.
How Often Should I Clean My Kitchenaid Ice Maker?
Clean the ice maker and water filter every 6 months to keep ice fresh and the machine working well.
Buying Guide On How To Fix Kitchenaid Ice Maker
1. Check the Water Supply Line
Start by making sure the water line is connected and open. A blocked or kinked line stops water flow. Fix any bends or damage to the tube. Confirm water pressure is normal for proper ice making.
2. Inspect the Ice Maker Assembly
Look for any broken or loose parts in the ice maker. Remove ice buildup around the mold or ejector arm. Clean the ice tray carefully to avoid damage. Replace parts if they appear worn or cracked.
3. Test the Water Inlet Valve
Verify the water inlet valve works by listening for a click. A faulty valve won’t fill the ice maker with water. Use a multimeter to check electrical continuity. Replace the valve if it fails the test.
4. Reset the Ice Maker
Turn off the ice maker for a few minutes to reset it. Press the reset button if your model has one. Power cycling can fix minor errors in the control board. Wait for the ice maker to restart its cycle.
5. Clean the Water Filter
Remove and inspect the water filter for clogs or dirt. Replace the filter every six months to keep water clean. A dirty filter reduces water flow and ice production. Use the correct filter type for your model.
6. Inspect the Temperature Settings
Ensure the freezer temperature is between 0 and 5 degrees Fahrenheit. Too warm stops ice from forming properly. Adjust the thermostat if needed and wait for changes. Check if the door seals tightly to keep cold air in.
7. Examine the Control Board
Look for signs of damage or burnt components on the control board. A faulty board can stop the ice maker from working. Consult a technician for testing and replacement. Avoid DIY repair on electrical parts without experience.
8. Defrost the Freezer
Ice buildup inside the freezer can block the ice maker parts. Turn off the freezer and let the ice melt naturally. Use a towel to soak up water as ice thaws. Restart the freezer once fully defrosted for better performance.
9. Check the Ice Maker Motor
Listen for motor sounds during the ice cycle. A silent or buzzing motor may be stuck or damaged. Test the motor with a multimeter for electrical faults. Replace the motor if it does not run properly.
10. Contact Professional Help
Seek service assistance if troubleshooting steps fail to fix the ice maker. Professionals have tools and knowledge for complex problems. Avoid risking further damage by attempting difficult repairs. Regular maintenance can prevent future ice maker issues.
Conclusion
Fixing your Kitchenaid ice maker can save time and money. Small problems like clogged water lines or dirty filters are easy to fix. Check the power supply and water connection first. Cleaning the ice maker regularly helps it work well.
Sometimes, resetting the machine solves many issues quickly. If parts are broken, replacing them can bring your ice maker back to life. Remember to follow safety steps before starting any repair. Taking care of your ice maker means you get fresh ice when you need it.
Don’t wait for a small problem to become bigger. With some simple steps, you can keep your ice maker running smoothly. A little effort goes a long way in keeping your kitchen running right. Fix it soon, enjoy cold drinks all year.


