Imagine transforming your kitchen into a stunning space with just one simple upgrade: a tile backsplash. You might think it’s a task reserved for professionals, but the truth is, you can do it yourself with a bit of guidance.
Installing a tile backsplash is not only a cost-effective way to enhance your kitchen’s aesthetic appeal, but it also protects your walls from spills and splatters. Picture yourself standing in your kitchen, admiring the beautiful tiles you’ve chosen. You can practically feel the pride and satisfaction of knowing you did it all by yourself.
This article will guide you through each step, ensuring you have the confidence and knowledge to complete the task. From selecting the right materials to understanding the techniques, you’ll discover that installing a tile backsplash is easier than you might think. So, are you ready to roll up your sleeves and create a kitchen that’s both functional and fabulous? Dive into this guide and unleash your inner DIY expert. You’ll soon realize that a stunning kitchen is just a few tiles away!
Tools And Materials Needed
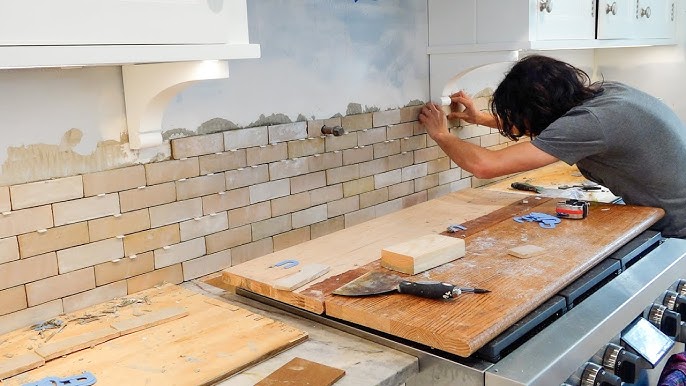
To install a tile backsplash, you’ll need some important tools. Gather a tile cutter for perfect cuts. A notched trowel helps spread adhesive. Use spacers to keep tiles even. A level ensures tiles are straight. Don’t forget safety goggles to protect your eyes.
You’ll also need materials. Buy tiles that match your kitchen. Get tile adhesive to stick them. Use grout to fill the gaps. A sponge helps clean excess grout. Have a bucket for water handy. These tools and materials make the job easier.
Remember, preparation is key. Having everything ready will save time. It also makes the process smoother.

Credit: www.youtube.com
Preparing The Surface
Clean the wall with a damp cloth. Remove any grease or dirt. Ensure the surface is dry and smooth. Old paint or wallpaper must be stripped away. Use sandpaper for rough spots. Fill any holes with putty. Let the putty dry before sanding it smooth. Use a level to check the flatness. The wall must be even for tiles. Measure the area carefully. You need to know how many tiles to buy. Mark the center of the wall with a pencil. This helps in aligning the tiles correctly.
Measuring And Planning Layout
Start by measuring the area for the tile backsplash. Use a tape measure to get the width and height. Write these numbers down. This helps in buying the right amount of tiles. Divide the area into small sections. This makes it easier to plan the layout.
Make a sketch of the wall. Draw lines to show where tiles will go. Think about how the tiles will look. Do you want a pattern or straight lines? Choose a design that fits your kitchen style.
Buy extra tiles. Mistakes can happen, and you might need more. It is better to have extra than not enough. Check for any obstacles like outlets or switches. Plan how tiles will fit around them. With a good plan, the job will be easier.
Cutting Tiles To Fit
Measure the wall space carefully. Use a tape measure for accuracy. Mark the cutting lines on the tiles. Always use a pencil for marking. Ensure the lines are straight. Use a tile cutter to cut the tiles. Tile cutters make clean cuts. Align the cutter with the marked line. Press down gently to cut. Check the fit against the wall. Adjust the cut if necessary. Remember, precision is key. Safety goggles protect your eyes.
Wear gloves to protect your hands. Tiles can be sharp. Handle them with care. Double-check the fit before installing. A dry fit helps ensure accuracy. Make adjustments as needed. Clean the cut edges for a smooth finish. Use sandpaper to smooth rough edges.
Applying Adhesive And Setting Tiles
Spread adhesive evenly on the wall using a notched trowel. Ensure every area is covered. Press each tile gently into place. Align tiles with spacers for even gaps. Work in small sections to keep adhesive fresh. Use a level to check tile straightness. Adjust tiles as needed for perfect alignment.
Allow tiles to set for a few minutes. Check for slipping or unevenness. Adjust quickly to avoid hardening. Wipe away excess adhesive. Keep tiles clean and adhesive-free. Let tiles dry completely before grouting. Follow drying times on adhesive packaging.

Credit: www.youtube.com
Grouting And Finishing Touches
First, mix the grout in a bucket. Follow the instructions on the package. The grout should be smooth and thick. Use a rubber float to apply the grout. Press it into the spaces between tiles. Hold the float at a 45-degree angle. Wipe off excess grout with a damp sponge. Rinse the sponge often to keep it clean.
Let the grout dry for about 20 minutes. Use a damp cloth to polish the tiles. Remove any grout haze on the tile surface. Be gentle to avoid removing the grout in the gaps. Seal the grout after it dries completely. This keeps it clean and strong. Follow the sealer’s instructions carefully.
Check for any missing grout spots. Fill them in if needed. Enjoy your new tile backsplash. It makes your kitchen look beautiful and clean.

Credit: www.create-enjoy.com
Frequently Asked Questions
What Tools Do I Need To Install Tile Backsplash?
To install a tile backsplash, you’ll need a few essential tools. Gather a tile cutter, notched trowel, spacers, level, and a grout float. Additionally, have a sponge, tape measure, and safety gear like gloves and goggles. These tools will help ensure a smooth and efficient installation process.
How Do I Prepare The Wall For Backsplash?
Start by cleaning the wall to remove grease or dirt. Ensure the surface is smooth and dry. Patch any holes or imperfections with spackle. Sand rough areas and use a primer if necessary. This preparation ensures the tiles adhere properly and results in a professional-looking finish.
How Do I Choose The Right Tile Adhesive?
Choose a tile adhesive based on the type of tiles and kitchen conditions. For most backsplashes, a pre-mixed thin-set mortar works well. Ensure it’s suitable for the tile material, whether ceramic or glass. Check for water resistance and flexibility to accommodate kitchen conditions.
How Long Does Tile Backsplash Installation Take?
The installation of a tile backsplash typically takes a weekend. Preparing the wall, cutting tiles, and setting them usually takes a day. Grouting and sealing require additional time, often the next day. Allow time for adhesive and grout to dry for optimal results.
Conclusion
Installing a tile backsplash can enhance your kitchen’s look. It’s a simple project with a big impact. Start with planning and gather your tools. Measure carefully to avoid mistakes. Lay the tiles evenly for a neat finish. Grout the tiles and let them dry completely.
Clean up the tiles to reveal a shiny new backsplash. You’ve transformed your space with a personal touch. Enjoy your handiwork every day. It’s rewarding to see the result. Proudly show off your new kitchen feature. Your kitchen now has a fresh, updated vibe.


