Is your KitchenAid mixer making more noise than usual, or is it not performing as smoothly as it once did? You might be surprised to know that a little bit of maintenance can go a long way in keeping your mixer running like new.
Lubricating your KitchenAid mixer is a simple task that can extend its life and ensure it operates efficiently. Imagine the satisfaction of whipping up your favorite recipes with ease, knowing your mixer is in peak condition. In this guide, you’ll discover the step-by-step process to lubricate your mixer, helping you maintain its performance and enjoy hassle-free cooking experiences.
Stay tuned to uncover how a few minutes of care can make a world of difference for your culinary adventures.
Tools And Materials Needed
Basic tools like a screwdriver and a soft cloth are essential. Food-grade lubricant and replacement parts may also be needed for smooth mixing.
- Food-safe lubricant:Choose a grease designed for kitchen appliances.
- Screwdrivers:Both flathead and Phillips types for opening screws.
- Clean cloths:For wiping grease and dirt from parts.
- Small brush or cotton swabs:Helps apply lubricant in tight spaces.
- Replacement parts:Optional, in case any gears or seals are worn out.
- Work gloves:Keep hands clean and safe from grease.
- Container:To hold small screws and parts safely.

Credit: thekrazycouponlady.com
Preparing The Mixer
Always unplug the mixerbefore starting any work. This ensures safety from electric shocks.
Clean the mixer head gently with a soft cloth. Remove any dust or food particles. Avoid using water near electrical parts.
To remove the mixer head, unlock the latch or lever on the side. Lift the head carefully to avoid damage.
Place the mixer head on a clean surface before lubricating. Keep all parts organized for easy reassembly.
Accessing The Gearbox
Find the screws that hold the mixer head in place. They are usually on the sides or back. Use a screwdriver to remove these screws carefully. Keep them safe for later use.
Once the screws are removed, gently lift the mixer head upward. This will expose the gearbox inside the mixer. Be careful not to force it or damage any parts.
- Check for hidden screws under labels or rubber feet.
- Use the correct screwdriver size to avoid stripping screws.
- Place screws in a small container to avoid losing them.

Credit: thekrazycouponlady.com
Choosing The Right Lubricant
Choosing the right greaseis key for a KitchenAid mixer. The grease must be food-safeand heat-resistant. Common types include silicone-basedand lithium-basedgrease. Silicone grease is smooth and good for plastic parts. Lithium grease is thicker and lasts longer under pressure.
Check the grease’s label for non-toxicand high-temperaturefeatures. Avoid regular automotive grease as it may damage the mixer.
| Brand | Type | Key Features |
|---|---|---|
| KitchenAid | Food-grade grease | Specifically made for KitchenAid mixers |
| Super Lube | Multi-purpose synthetic grease | Non-toxic, water-resistant, long-lasting |
| CRC | Silicone grease | Safe for plastics, heat stable |
Applying The Lubricant
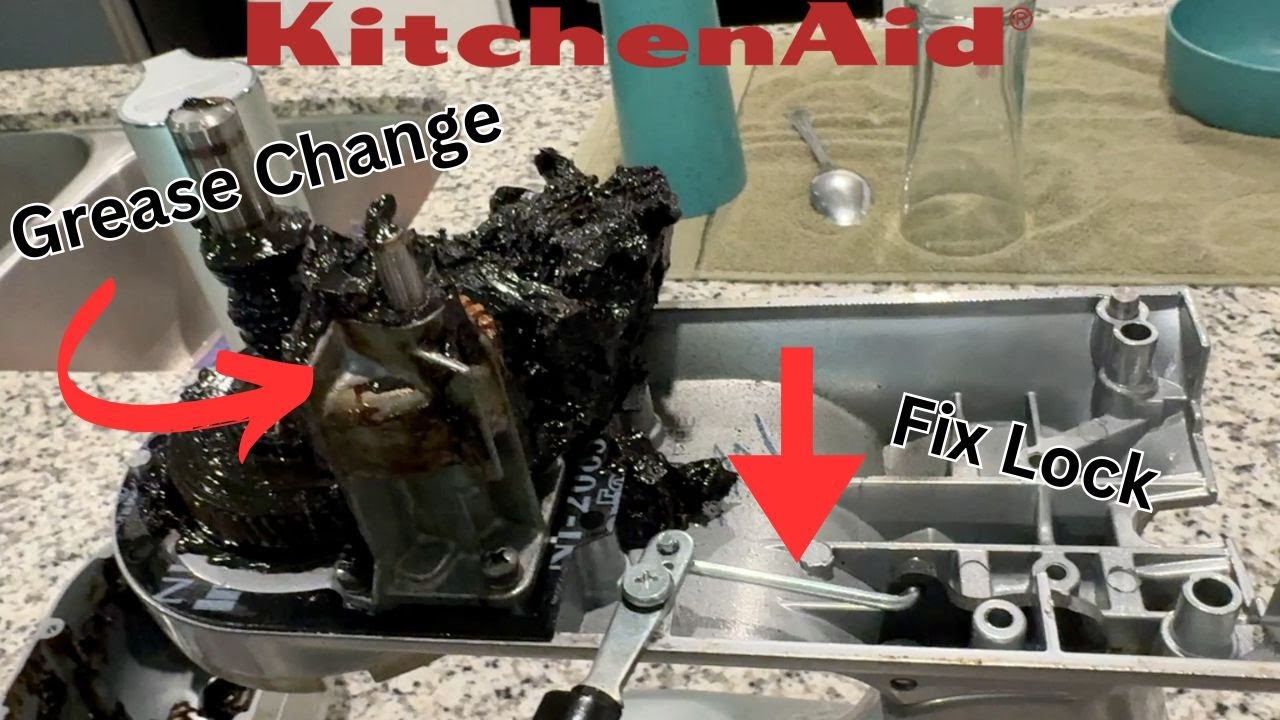
Old grease inside the mixer must be removed first. Use a clean cloth or paper towel to wipe away the grease. You can also use a small brush to reach tight spots. Avoid leaving any residue, as it can mix with new grease and cause problems.
Choose a high-quality lubricant made for kitchen mixers. Apply a small amount of new grease to the gears and moving parts. Spread it evenly using a clean finger or a small brush. Too much grease can attract dust and dirt, so apply just enough.
After applying the grease, carefully put all parts back together. Make sure each piece fits well and moves smoothly. Tighten any screws or bolts securely, but do not over-tighten. Test the mixer by turning it on for a few seconds to check its movement.
Testing The Mixer
Run the mixer without any attachments. This helps check if it turns smoothly. Listen for unusual noiseslike grinding or squeaking. These sounds may mean parts need more lubrication.
Watch the mixer as it runs. It should move without jerks or stops. Smooth movement shows the internal gears work well. If the mixer struggles, lubrication might be low.
Feel the mixer body. It should not get too hot during operation. Overheating could mean friction inside. Proper lubrication reduces heat and wear.
- Run mixer at low speed first.
- Listen for quiet, smooth sound.
- Check for steady motion.
- Stop if any strange noises appear.
- Feel if the mixer warms up too much.
Maintenance Tips
Regular lubrication keeps your Kitchenaid mixerrunning smoothly. Typically, lubrication is needed once a yearor after about 300 hours of use. This helps prevent wear and tear on the gears and motor. Frequent use or heavy mixing may require lubrication more often.
Look for these signs that your mixer needs lubrication:
- Unusual grinding noisesduring operation
- Mixing attachments move slowerthan usual
- Motor feels hotterthan normal
- Attachments jerk or stallwhile mixing
- Visible wearor dried grease inside the mixer

Credit: www.amazon.com
Frequently Asked Questions
How Often Should I Lubricate My Kitchenaid Mixer?
You should lubricate your KitchenAid mixer every 1-2 years. Regular lubrication keeps gears running smoothly. It prevents wear and extends the mixer’s life. Check the manual for specific guidance based on usage.
What Type Of Grease Is Best For Kitchenaid Mixers?
Use food-grade silicone or lithium-based grease. These greases are safe for kitchen appliances. Avoid petroleum-based lubricants, as they can damage parts. Always apply grease sparingly to gears and moving components.
Can I Lubricate My Kitchenaid Mixer Myself?
Yes, you can lubricate it yourself with basic tools. Unplug the mixer, remove the outer casing carefully, and apply grease to gears. Follow your model’s manual for detailed steps. Regular maintenance improves performance and prevents costly repairs.
What Are Signs My Kitchenaid Mixer Needs Lubrication?
Listen for grinding or squeaking noises during operation. If the mixer runs slower or struggles under load, lubrication may be needed. Excess heat or unusual smells can also indicate friction inside the gears.
Conclusion
Regular lubrication keeps your KitchenAid mixer running smoothly. It helps avoid wear and tear on moving parts. Clean the mixer before applying fresh grease carefully. Use the right type of lubricant for best results. Taking small steps now saves costly repairs later.
Your mixer will work quietly and last longer. A little care goes a long way with KitchenAid mixers. Keep this routine to enjoy baking without interruptions. Simple maintenance ensures your mixer stays reliable every day.