
Imagine watching your child’s creativity blossom in a world where nature and play collide. A mud kitchen isn’t just a playground fixture; it’s a gateway to endless imagination, sensory exploration, and even a bit of messy fun.
You’re about to discover how to build a mud kitchen that will not only transform your backyard but also captivate your child’s curiosity. Why settle for conventional toys when you can offer an adventure in creativity and learning? This guide will show you step-by-step how to create a mud kitchen that sparks joy and encourages learning through play.
Picture your little one concocting mud pies and leafy potions, all while honing vital motor skills and engaging with nature. You’re just a few easy steps away from enriching your child’s playtime with this hands-on project. Ready to dive into a world where dirt is delightful and imagination knows no bounds? Let’s dig in!
Credit: www.thunderbirddisco.com
Choosing The Right Location
A mud kitchen needs a safe spot. Look for a flat area. Make sure it is away from busy roads. Avoid places with too much wind. Too much sun might be bad. Shade helps keep it cool. Think about space for kids to play. Grass is nice, but dirt works too. Easy access is important. Kids will need to reach their toys. Close to the house is good. Parents can watch from nearby.
Water access is a must. Kids love mixing water with mud. A nearby hose or tap is handy. Make sure it’s easy to clean up after. Choose a spot with space for storage. You might need a box or shelf. This keeps tools tidy and safe. A good location makes playtime fun.

Credit: hanashappyhome.com
Essential Materials And Tools
Building a mud kitchen is fun. You will need some basic materials. Wooden pallets are great for structure. Plastic tubs can be used as sinks. Old pans and bowls are perfect for play. Stones and sand add texture. Keep it simple and safe for kids.
Gather your tools before starting. Hammer and nails are essential. A screwdriver is handy for fixing. You might need a saw for cutting wood. Measuring tape helps to measure accurately. Safety gloves protect your hands. Ensure tools are safe for use.
Designing Your Mud Kitchen
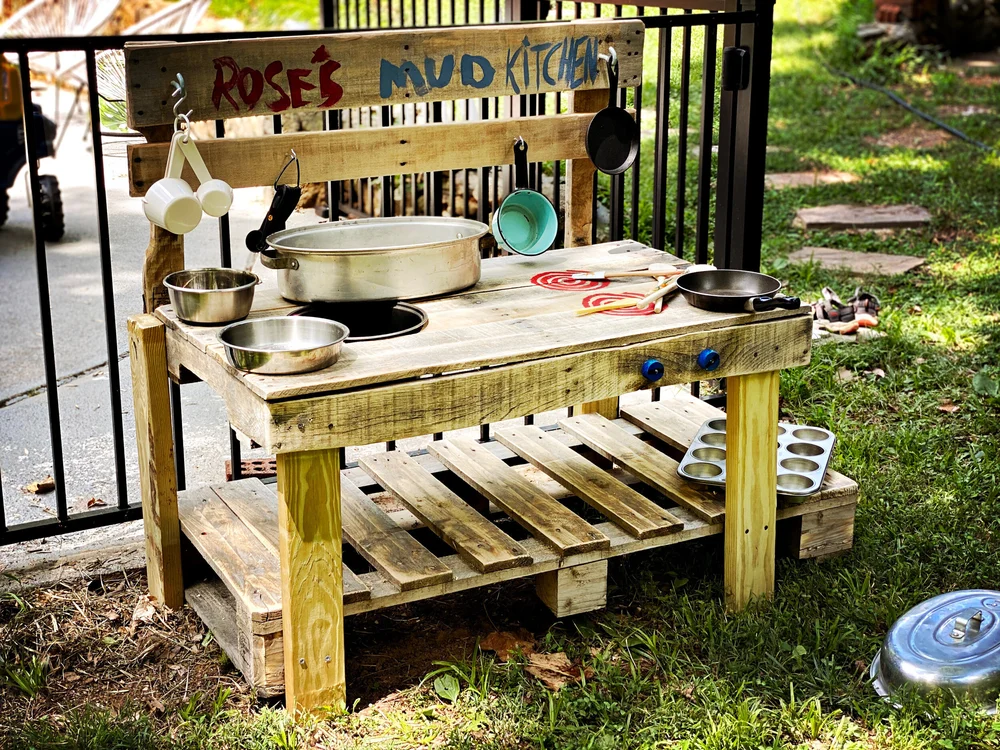
Create a sturdy frame using wooden pallets for the base of your mud kitchen. Add a sink and counter made from old containers for a playful cooking area. Decorate with colorful paint and accessories to invite endless imaginative play.
Size And Shape Considerations
Choose a size that fits your space. Measure your backyard or garden. Smaller kitchens work well in tight spaces. Larger ones offer more room to play. Consider the shape of the kitchen. Square or rectangular shapes are popular. Think about the height too. Kids need to reach easily. Make sure it’s comfortable for them.
Incorporating Functional Features
Add shelves to store kitchen tools. Use hooks for hanging pots and pans. Include a sink for water play. A working water pump adds fun. Have a tabletop for mixing mud pies. Add a chalkboard for drawing and writing. Ensure durable materials are used. Wood and plastic are good options. Make sure everything is safe. Avoid sharp edges and splinters.

Credit: www.instagram.com
Building The Structure
Creating a mud kitchen involves setting up a simple frame using wood or pallets. Add shelves for storing utensils and mud supplies. Ensure stability by securing the structure firmly to the ground.
Constructing The Base
The base is the foundation of your mud kitchen. Use sturdy wood or pallets for strength. Arrange the wood pieces into a rectangle shape. Secure them tightly with nails or screws. The base should be stable and firm. Ensure it is level on the ground. This prevents wobbling and keeps it safe.
Assembling The Countertop
Choose waterproof material for the countertop. This can be plastic or treated wood. Cut it to fit the base dimensions. Attach the countertop securely with screws. Make sure it is flat and smooth. A smooth surface helps easy play and cleaning. Consider adding a small sink or basin. This makes washing hands fun.
Adding Kitchen Elements
Adding a sink makes your mud kitchen more realistic. Use a plastic bowl or old sink. Ensure it is safe and easy to clean. Cut a hole in the countertop to fit the bowl. Secure the bowl with strong glue or screws. Leave some space for water drainage. Create a simple tap with a hose or pipe. This adds fun and makes washing easy.
Storage spaces keep your kitchen neat. Use shelves and hooks to organize tools. Add baskets for storing mud, sticks, and leaves. Secure the shelves to the walls for safety. Use strong materials to hold heavy items. Label the storage areas for easy access. This helps keep everything tidy and easy to find.
Decorating And Personalizing
Building a mud kitchen offers a fun outdoor activity for kids. Start by gathering materials like old pallets and sinks. Add personal touches with colorful paint, utensils, and pots to create an inviting play space.
Using Paint And Finishes
Choose bright colors to make the mud kitchen fun. Paint adds a splash of joy. Use weatherproof paint for durability outside. Finishes can protect the wood. Consider using a clear coat for shine. Patterns and stencils can add creativity. Kids love colorful designs. Use bold colors like red or blue. Let kids help choose their favorite colors. This makes it special for them.
Adding Fun Accessories
Accessories make the kitchen exciting. Add colorful buckets and spades. Use small pots and pans for pretend cooking. Wooden spoons are perfect for mixing mud. Rubber gloves can keep hands clean. Add toy fruits and veggies for play. Hang cups and mugs for pretend tea parties. Small watering cans can be fun for pretend washing. These items spark imagination and creativity. Kids can create fun stories and adventures.
Safety Tips
Always check the area for sharp objects. Remove stones and glass. Make sure the ground is even. This prevents falls and trips. Use only safe and non-toxic materials. Avoid using metal or glass items. These can break and hurt kids.
Supervise children while they play. Keep an eye on their activities. Teach them to share and play gently. Set rules for safe play. Explain the importance of not throwing or misusing tools. Encourage washing hands after play. This keeps them clean and healthy.
Provide a first aid kit nearby. Be ready for small cuts and bruises. Check the weather before playtime. Avoid playing in extreme heat or cold. Choose a shaded area if possible. Safety comes first when having fun.
Maintenance And Care
Regularly clean mud kitchens to prevent dirt buildup. Use a soft brush and mild detergent to maintain surfaces. Protect wooden parts with non-toxic sealant to enhance durability and resist weather damage.
Cleaning The Mud Kitchen
Keep the mud kitchen clean to make it last longer. Use a soft cloth to wipe off dirt. Avoid harsh chemicals. Water and mild soap work best. Clean the sink and counters weekly. Rinse with clean water after play. This prevents dirt build-up.
Protecting From Weather
Shield the kitchen from rain and strong sun. Place it under a shelter or tarp. This keeps the wood from rotting. Paint or seal the wood to make it waterproof. Check for damages often. Fix cracks or loose parts right away.
Regular Checks
Inspect the mud kitchen monthly. Look for broken or sharp edges. Tighten any loose screws. Replace worn-out parts. Safe play is fun play. Encourage kids to help with care. This teaches responsibility.
Frequently Asked Questions
What Materials Do I Need For A Mud Kitchen?
To build a mud kitchen, gather wooden pallets, old sinks, and plastic containers. Use screws and nails for assembly. Reuse kitchen utensils like spoons and bowls. Waterproof paint is ideal for protection. Add shelves or hooks for storage. Personalize with colorful decorations and labels.
How Much Does It Cost To Build A Mud Kitchen?
The cost of building a mud kitchen varies. It ranges from $20 to $150. Costs depend on materials and design complexity. Using recycled materials reduces costs significantly. Buying new items increases the budget. Set a budget before starting.
How Can I Weatherproof My Mud Kitchen?
To weatherproof a mud kitchen, use outdoor-grade paint. This protects wood from moisture and sun. Seal joints with waterproof sealant. Consider using a tarp or cover during heavy rain. Regularly check for damage and repaint as needed. This prolongs the kitchen’s lifespan.
Is A Mud Kitchen Safe For Children?
Yes, a mud kitchen is generally safe for children. Ensure the structure is sturdy and stable. Avoid sharp edges and protruding nails. Use non-toxic paints and materials. Supervision is recommended during play. Teach children about cleanliness and hygiene after playing.
Conclusion
Creating a mud kitchen is simple and fun. Children love playing and exploring with mud. It’s a space for creativity. It encourages imaginative play and learning. Building it together strengthens family bonds. Gather basic materials like wood, containers, and tools.
Design it to fit your space. Use natural items for decoration. Keep safety in mind, always. Regular cleaning helps maintain the mud kitchen. Enjoy watching kids discover and invent. Their laughter and joy make it all worthwhile. A mud kitchen is a gift of endless play.
So, let the fun begin!






One Response