Are you tired of struggling with messy, complicated plumbing tasks? Connecting a water hose to your kitchen sink might sound tricky, but it doesn’t have to be.
With the right steps, you can do it quickly and confidently—no need to call a plumber or spend hours figuring it out. In this guide, you’ll discover simple, clear instructions that anyone can follow. By the end, you’ll have your water hose hooked up perfectly, saving you time and hassle.
Ready to make your kitchen setup easier? Let’s get started!
Tools And Materials Needed
Essential tools make the job easier and safer. You will need a wrenchto tighten connections. A screwdriverhelps secure clamps. Use pliersfor gripping small parts. A towelor rag keeps the area dry and clean.
| Required Hose Types | Description |
|---|---|
| Standard Garden Hose | Fits most kitchen sink faucets. Easy to connect. |
| Expandable Hose | Lightweight and flexible. Expands with water flow. |
| Reinforced Hose | Durable and strong. Good for high water pressure. |
- Hose clamps:Secure the hose on the faucet.
- Teflon tape:Seals connections to prevent leaks.
- Bucket or bowl:Catch any water during installation.

Credit: www.amazon.com
Preparing The Kitchen Sink
Start by turning off the water supply. This stops water flow and prevents leaks. Find the shutoff valve under the sink or near the main water line. Turn it clockwise until tight.
Next, clear the area under the sink. Remove any items like cleaning supplies or trash bins. This gives you enough space to work comfortably and safely. Clean the space to avoid dust or dirt getting into the hose connection.
Choosing The Connection Point
Connecting to the cold water lineis usually best. Cold water is safer and won’t burn. Locate the cold water pipe under your sink. It’s often on the right. Turn off the water supply before starting. Check for leaks after connecting. Always use a wrenchto tighten the connections.
A splitterhelps if you need two connections. Attach it to the cold water line. Make sure it’s secure and tight. A valve can help control water flow. Turn the valve to open or close the water. This helps manage water pressure. Use plumber’s tapeto seal connections. This prevents leaks and water waste.

Credit: www.sinkple.com
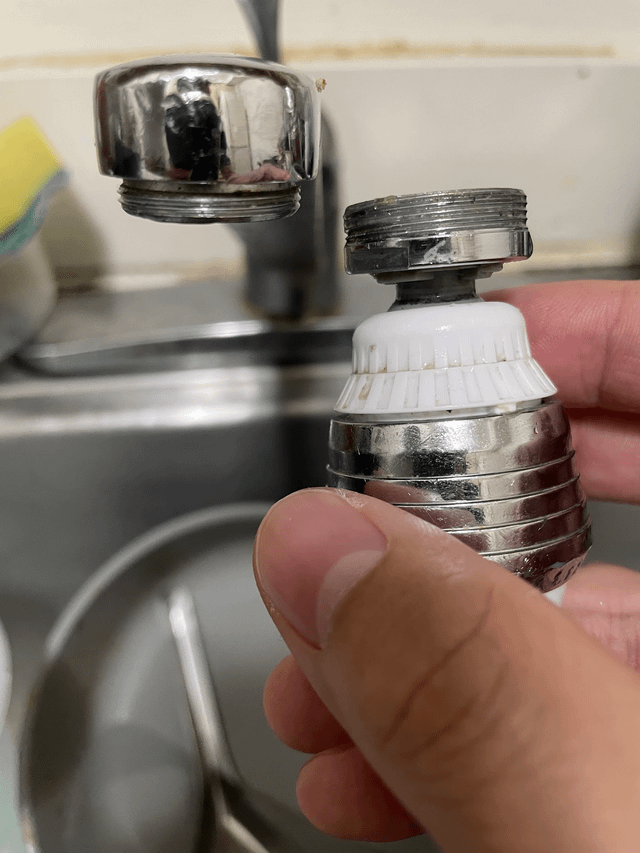
Attaching The Hose To The Faucet
Start by carefully unscrewing the existing aeratorfrom the faucet tip. Use a cloth to protect the faucet from scratches. If the aerator is stuck, try twisting it gently with pliers.
Next, check the faucet for any debris or damage. Clean the threads to ensure a tight fit for the adapter or connector.
Choose the right adapter or connectorthat fits both the faucet and hose. Screw the adapter onto the faucet threads by hand. Avoid over-tightening to prevent damage.
Slide the hose onto the adapter securely. Use the hose clamp or connector nut to fix it in place. Tighten with a wrench, but do not force it.
- Make sure the hose is snug and there are no gaps.
- Check for leaks by turning on the water slowly.
- Adjust tightness if needed to stop drips.
Connecting Hose To Water Supply
Attach the hose to the shutoff valveunder the sink carefully. Make sure the valve is fully closedbefore starting. Screw the hose connector onto the valve’s threaded end by hand. Avoid cross-threading by turning gently. Use a wrenchto tighten the connection securely but do not overtighten. This prevents damage to the valve or hose.
Ensuring a tight sealis key to stopping leaks. Check the hose connector’s rubber washeris in place and in good condition. Replace it if worn out. After tightening, slowly open the shutoff valve and watch for water leaks. Tighten more if any drips appear.
- Check valve is closed before attaching hose
- Hand-tighten hose connector first
- Use wrench to secure but avoid overtightening
- Inspect rubber washer for damage
- Open valve slowly to test seal
Testing For Leaks
Turn on the water slowlyto avoid sudden pressure. This helps spot leaks early. Watch for water drips around the hose and sink area. A slow flow lets you check all connections carefully.
- Look at the hose connection to the sink faucet.
- Check where the hose meets the water supply valve.
- Inspect the hose itself for any cracks or holes.
Tighten any loose connections gently to stop leaks. A small leak can cause water damageif ignored. Keep a towel nearby to wipe water and test again.
Maintenance Tips
Regularly check the water hose for leaks or cracks. Small leaks can cause big problems later. Look under the sink and around the hose connections. Replace any worn or damaged parts quickly. Tighten loose connections to stop drips.
Prevent kinks by keeping the hose straight and untwisted. Kinks block water flow and damage the hose. Store the hose carefully after use. Avoid sharp bends near the faucet or under the sink. Use hose guides or clips to keep it in place.

Credit: www.familyhandyman.com
Frequently Asked Questions
How Do I Connect A Water Hose To A Kitchen Sink?
To connect a water hose, first turn off the water supply. Attach a hose adapter to the sink faucet, then secure the hose to the adapter. Ensure all connections are tight to prevent leaks.
What Tools Are Needed To Connect A Hose To A Sink?
You need an adjustable wrench, a hose adapter, and plumber’s tape. These tools help secure the hose tightly and prevent leaks during connection.
Can I Connect Any Water Hose To My Kitchen Sink?
No, not all hoses fit every sink faucet. Use a hose adapter that matches your faucet size for a secure connection.
How Do I Prevent Leaks When Attaching A Water Hose?
Use plumber’s tape on threaded connections and tighten fittings properly. Check for leaks by turning on water slowly and inspecting all joints.
Conclusion
Connecting a water hose to your kitchen sink is simple and quick. Follow the steps carefully, and you will avoid leaks. Use the right tools and check all connections tight. This setup helps with watering plants or cleaning tasks. Stay patient and take your time during the process.
Now, you can enjoy the convenience of your new water hose connection. Keep your kitchen sink area clean and safe after installation. Practice these easy tips for a smooth experience every time.


