Have you ever tried to clean your kitchen faucet sprayer but didn’t know where to start? Removing the sprayer might seem tricky, but it’s easier than you think.
Whether you need to fix a leak, replace a part, or just give it a good clean, knowing how to remove the sprayer will save you time and frustration. In this guide, you’ll discover simple, step-by-step instructions that anyone can follow.
Keep reading, and you’ll be able to handle this common kitchen task like a pro.
Tools Needed
To remove the sprayer from a kitchen faucet, certain tools are essential. Having the right tools makes the job easier and faster.
- Adjustable wrench– to loosen nuts and fittings.
- Screwdriver– usually Phillips or flathead, to remove screws.
- Pliers– to grip and pull out tight parts.
- Bucket or bowl– to catch any water dripping from pipes.
- Rag or cloth– to wipe up water and protect surfaces.
- Teflon tape– useful for sealing threads during reassembly.

Credit: www.reddit.com
Locate The Sprayer Hose
The sprayer hoseis usually found under the kitchen sink. It connects the sprayer head to the water supply. To locate it, open the cabinet below the sink. Look for a flexible hose that runs from the faucet to the sprayer. The hose may be coiled or straight. It is often attached with a clip or a bracket. Sometimes, the hose has a quick-connect fitting for easy removal. Check near the faucet base for the other end of the hose. Make sure to clear any items blocking your view under the sink. Finding the hose is important before trying to remove the sprayer.
Turn Off Water Supply
Locate the main water valveunder the sink or near the water meter. Turn the valve clockwiseto shut off the water supply. This stops water flow to the kitchen faucet and sprayer.
Open the faucet to release any remaining waterin the pipes. This helps to avoid spills when removing the sprayer. Check that no water flows out before starting the removal.
- Find the shutoff valves under the sink.
- Turn valves clockwise to close.
- Open faucet to drain water.
- Ensure water stops flowing completely.
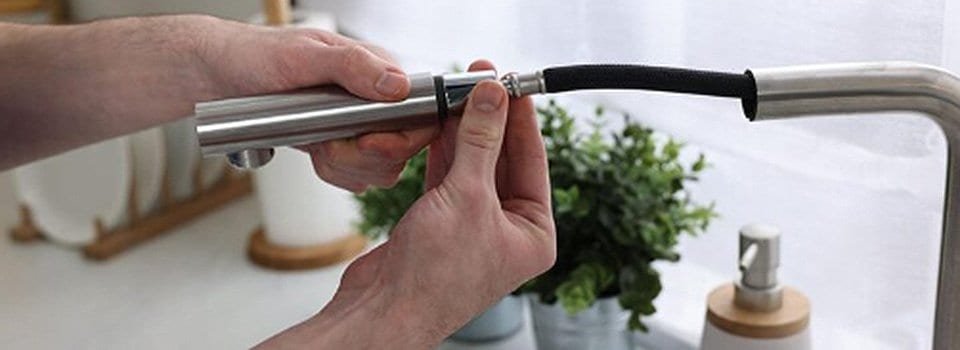
Disconnect The Sprayer Hose
Locate the sprayer hose under the sink. It connects the faucet to the sprayer head.
First, turn off the water supply to avoid leaks.
Use a wrench or pliers to loosen the hose connection. Turn it counterclockwise to unscrew.
Place a bucket or towel underneath to catch any water left in the hose.
Gently pull the hose away from the faucet once it is loose.
Check the hose for any damage or clogs before reattaching or replacing it.
Remove The Sprayer Head
First, turn off the water supply under the sink. This prevents water spills. Next, locate the nut holding the sprayer head. Use a wrench to loosen it. Make sure to hold the hose tight. This stops it from twisting. Once the nut is loose, gently pull the sprayer head off. Be careful not to damage the hose. If the sprayer is stuck, wiggle it gently. This helps to free it.
Some sprayers have clips. Check if yours does. If so, remove the clip carefully. This allows the sprayer to come off easily. Remember, the sprayer might have some water inside. So, have a towel ready. This helps to catch any drips.
Check For Leaks
Check the sprayer hose and faucet base for any water drips. Even small leaks can cause damage over time. Use a dry cloth to wipe around the connection points. If the cloth gets wet, there is a leak. Tighten any loose connections gently with a wrench. Avoid over-tightening to prevent damage.
Turn on the faucet and spray to test the flow. Watch closely for any water escaping from joints. If leaks persist, the O-rings or washersmay need replacement. Keep a bucket or towels nearby to catch drips during this process.
Reassemble Or Replace Parts
Check the sprayer parts carefully for any damage or wear. Clean all parts with warm water and mild soap. Replace damaged parts with new ones that fit your faucet model.
To reassemble, follow these steps:
- Insert the sprayer hose back into the faucet body.
- Attach the sprayer head firmly to the hose.
- Secure any clips or fasteners that hold the sprayer in place.
- Turn on the water to test for leaks or loose connections.
If leaks appear, tighten connections or replace washers. A well-fitted sprayer ensures smooth water flow and prevents drips.

Credit: diy.stackexchange.com
Tips For Maintenance
Turn off the water supply before starting. This stops leaks and water waste. Find the hose under the sink that connects to the sprayer. Twist the hose connector counterclockwise to loosen it. Pull the sprayer head gently from its holder.
Check the sprayer for dirt or damage. Clean or replace parts if needed. Use a small brush to clear out debris inside the hose. Reattach the sprayer by twisting the hose connector clockwise. Turn the water supply back on and test the sprayer for leaks.
- Use a cloth to protect the faucet finish.
- Keep a bucket handy to catch water drips.
- Do not force parts to avoid damage.
- Regularly clean sprayer to prevent clogging.

Credit: www.reddit.com
Frequently Asked Questions
How Do I Safely Remove A Kitchen Faucet Sprayer?
Turn off the water supply first. Disconnect the hose under the sink. Unscrew the sprayer head by twisting it counterclockwise. Use pliers if needed, but protect the finish with tape.
What Tools Are Needed To Remove A Kitchen Faucet Sprayer?
You typically need adjustable pliers, a bucket, and a towel. Pliers help loosen connections. The bucket catches water drips. The towel protects surfaces and absorbs spills.
Can I Remove The Sprayer Without Turning Off Water?
No, always turn off the water supply. This prevents leaks and water damage. Turning off water ensures a safe and clean removal process.
How Do I Avoid Damaging The Faucet Sprayer During Removal?
Use gentle twisting and avoid excessive force. Protect the sprayer with a cloth or tape when using pliers. Follow manufacturer instructions if available.
Conclusion
Removing a kitchen faucet sprayer is easier than it seems. Follow each step slowly and carefully. Make sure to turn off the water first. Use the right tools to avoid damage. Check for any leaks after removal. Keep the sprayer parts safe if you plan to reuse them.
This simple task can save you time and money. Try it yourself and feel confident fixing small kitchen issues. A little patience goes a long way.


