Is your Delta kitchen faucet dripping or not working like it used to? You don’t have to call a plumber or replace the whole thing just yet.
Fixing your faucet yourself can save you time, money, and frustration. In this guide, you’ll discover simple steps to repair your Delta kitchen faucet quickly and confidently. Whether it’s a leak, low water pressure, or a loose handle, you’ll learn exactly what to do to get your faucet back in perfect shape.
Keep reading, and you’ll have your kitchen running smoothly again in no time.

Credit: www.youtube.com
Tools And Materials Needed
Gather these tools and materialsbefore starting the repair. A adjustable wrenchhelps loosen nuts and bolts. Use a screwdriverto remove screws carefully. A replacement cartridgefits most Delta faucets. Keep some plumber’s greasefor smooth assembly. Prepare a clean clothto catch drips and protect surfaces. Have a bowl or bucketready to catch water. Teflon tapeseals threads to prevent leaks. Optionally, use needle-nose pliersfor hard-to-reach parts. A flashlighthelps see inside the faucet. Lastly, keep paper towelshandy for quick cleanup.
Identifying The Problem
Leaking faucetswaste water and can cause damage. Check the faucet base and spout for drops. A worn-out washer or O-ring often causes leaks. Tighten loose parts or replace damaged seals.
Low water pressuremight result from clogged aerators or supply lines. Remove the aerator and clean it with vinegar. Inspect the water valves to ensure they are fully open. Sediment build-up can block water flow.
Handle issuesinclude stiffness, looseness, or difficulty turning. Tighten the handle screw if it feels loose. Lubricate moving parts with plumber’s grease to ease stiffness. Replace worn cartridges to restore smooth operation.
Shutting Off Water Supply
Locate the water shut-off valves under the sink. Turn both valves clockwise to close. This stops the water flow to the faucet. Test by turning the faucet on. No water should come out.
If there are no valves under the sink, turn off the main water supply. This valve is usually near the water meter or where water enters the home. After closing the valve, open the faucet to release any water left in the pipes.
Always use a cloth or small container to catch any dripping water during this process. This keeps the area dry and clean.

Credit: www.youtube.com
Disassembling The Faucet
Start by finding the small cap on the faucet handle. Use a flathead screwdriver to gently pry it off. Underneath, a screw holds the handle in place. Use a Phillips screwdriver to remove this screw. Pull the handle straight up to detach it from the faucet body.
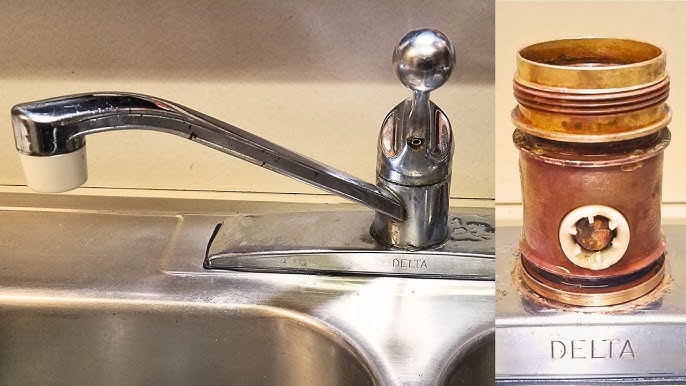
With the handle removed, the internal parts become visible. These include the cartridge, springs, and seals. Carefully examine these components for any damage or wear. Use pliers to gently pull out the cartridge if needed. Keep track of all pieces to ensure proper reassembly.
Replacing The Cartridge
Begin by turning off the water supply under the sink. Open the faucet to drain any water left inside. Use a screwdriver or Allen wrench to remove the handle. Next, take off the retaining clip or nut holding the cartridge in place. Carefully pull out the old cartridge by gripping it firmly. Check for any debris or damage inside the faucet body. Clean the area if needed before installing the new cartridge.
Align the new cartridge properly with the faucet body. Push it in gently until it fits snugly. Replace the retaining clip or nut to secure the cartridge. Reattach the handle and tighten screws or bolts. Turn the water supply back on slowly to check for leaks. Test the faucet by running water and moving the handle. Ensure smooth operation and no drips.
Fixing Leaks And Drips
Leaks and drips often happen because O-ringsor sealswear out. These small parts stop water from escaping. Replacing them can fix most leaks easily. First, turn off the water supply. Then, take off the faucet handle to find the worn rings and seals. Replace them with new ones that match the size and type.
Tightening connections is another way to stop drips. Loose nuts or fittings can let water leak out. Use a wrench to gently tighten all parts. Avoid over-tightening, which can break the faucet. Check all joints carefully and tighten as needed. This simple fix often stops leaks without replacing parts.
Reassembling The Faucet
Reassembling a faucet is like solving a simple puzzle. First, check all parts are clean and dry. Use a soft cloth to wipe them. Place the cartridgeback into the faucet body. Ensure it fits snugly. Next, secure the retaining nutwith a wrench. Turn it gently to avoid damage. Attach the handle over the cartridge stem. Fasten it with the screw you removed earlier.
Now, reattach the faucet cap. Press it down until it clicks. Check each piece is tight and in place. Finally, turn on the water supply slowly. Watch for leaks as water flows. Tighten any loose connections if needed. This completes your faucet reassembly.

Credit: www.youtube.com
Testing The Repair
Turn on the faucet gently. Check for any leaks around the base. Ensure all parts are tight. Listen for unusual sounds. Water should flow smoothly. If water is not smooth, check for debris. Adjust the handle for smooth movement. Ensure hot and cold water mix properly. If leaks persist, check the seals again. Tighten any loose connections. Use a towel to dry the area. This helps spot new leaks. Observe for a few minutes. Make sure the faucet operates well. A well-repaired faucet saves water. It also stops annoying drips.
Preventive Maintenance Tips
Regular care keeps a Delta kitchen faucet working well for years. Clean the faucet with a soft cloth and mild soap. Avoid harsh cleaners that can damage the finish. Check for leaks around handles and spouts often.
Replace worn out washers or O-rings quickly to stop drips. Tighten loose parts to prevent water waste. Use a gentle brush to clear mineral build-up in aerators and spray heads.
- Wipe faucet dry after use to avoid water spots.
- Do not force handles or spouts to move.
- Shut off water valves before repairs or cleaning.
- Use only Delta-approved replacement parts.
Following these simple steps helps prevent major problems and saves money.
Frequently Asked Questions
How Do I Fix A Leaking Delta Kitchen Faucet?
To fix a leaking Delta kitchen faucet, first turn off the water supply. Then, disassemble the faucet and replace worn-out O-rings or cartridges. Clean all parts before reassembling. Test the faucet to ensure the leak is gone. Regular maintenance helps prevent future leaks.
What Tools Are Needed To Repair Delta Faucets?
Basic tools for repairing Delta faucets include an adjustable wrench, Allen keys, screwdrivers, and pliers. You may also need replacement parts like cartridges or O-rings. Having a plumber’s grease and a towel handy helps during the process. Always follow the manufacturer’s repair guide.
How Can I Replace A Delta Faucet Cartridge?
Turn off the water supply, remove the handle, and unscrew the retaining nut. Pull out the old cartridge carefully. Insert the new cartridge in the same position. Reassemble the faucet parts, turn on the water, and test for leaks. Cartridge replacement stops dripping efficiently.
Why Is My Delta Kitchen Faucet Dripping Continuously?
Continuous dripping often results from a worn cartridge or damaged O-rings inside the faucet. Mineral buildup can also cause the drip. Cleaning or replacing these parts usually fixes the problem. Regular cleaning prevents deposits and prolongs the faucet’s lifespan. Seek professional help if issues persist.
Conclusion
Repairing a Delta kitchen faucet can save time and money. Start with the right tools and follow clear steps. Check for leaks and replace worn parts carefully. Taking your time helps avoid mistakes. A well-fixed faucet works smoothly and lasts longer.
Keep your faucet clean to prevent future problems. Small repairs keep your kitchen running well. Enjoy the satisfaction of fixing things yourself. Simple fixes make a big difference at home.


