
Imagine walking into your kitchen and finding a leaky sink. It’s a small problem that can turn into a big headache.
But what if you could fix it yourself without calling a plumber? Learning how to install kitchen sink pipes can save you money and give you a sense of achievement. This guide is here to empower you. Whether you’re dealing with a new sink installation or replacing old pipes, we’ve got you covered.
You’ll discover that with just a few tools and some straightforward steps, you can tackle this task like a pro. By the end of this article, you’ll have the confidence and know-how to ensure your kitchen sink is in perfect working order. Curious to learn how? Keep reading, and let’s transform that daunting task into a manageable DIY project.
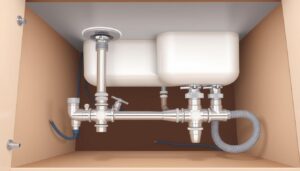
Credit: avorenovations.co.uk
Tools And Materials Needed
Gather essential tools like pipe wrench, plumber’s tape, and a hacksaw. PVC pipes, connectors, and sealant are crucial materials. Ensure a bucket is handy to catch any water spills.
- Wrench: Tighten and loosen pipe connections easily.
- Pipe cutter: Cut pipes to the needed length.
- Plumber’s tape: Stop leaks and seal pipe threads.
- PVC pipes: Carry water through the sink system.
- Pipe elbows: Help change the direction of pipes.
- Pipe glue: Secure PVC pipes together firmly.
- Bucket: Catch any water spills during installation.
- Safety goggles: Protect eyes from flying debris.

Credit: www.youtube.com
Preparing The Workspace
Clear the area under the sink. This makes room to work. Remove any stored items. It helps avoid clutter. Gather your tools and materials. You will need a wrench, tape, and new pipes. Make sure you have everything before starting. Turn off the water supply. This prevents any leaks or spills. Check that the valves are closed tight. Place a bucket under the sink. It catches any water that may spill. Have a towel ready for any mess.
Good lighting is important. Use a flashlight if needed. This helps you see clearly. Make sure you have enough space. Move any obstacles out of the way. It makes the task easier and quicker.
Removing The Old Sink Pipes
Start by turning off the water supply. Locate the valves under the sink. Twist them clockwise to close. Use a wrench to loosen the nuts on the pipes. Gently pull the pipes away from the sink. Be careful not to damage the sink or cabinet.
Place a bucket under the pipes. This will catch any leftover water. Slowly remove each pipe. Inspect them for wear and tear. Note any corrosion or damage. This helps you decide on replacements.
Clean the area after removal. Wipe away any dirt or debris. Ensure the space is ready for new pipes. This makes the installation easier.
Measuring And Cutting New Pipes
Measure the space under the sink first. Use a tape measurefor accuracy. Write down the length and width of the area. Next, choose the right pipe type. PVC is often used in kitchens. It’s durable and easy to cut.
Mark the pipe where you need to cut. Use a pencilfor marking. Ensure the mark is clear. Hold the pipe steady with a clamp. This helps in cutting straight. Use a sawto cut the pipe. Be careful when cutting. Wear gloves to protect your hands. Check the cut for smoothness. Use a file if needed.
Fitting The New Pipes
Discover easy steps for installing kitchen sink pipes. Ensure a perfect fit by measuring and cutting pipes accurately. Secure connections with quality fittings for a leak-free setup.
Connecting The Drain Pipe
Start by connecting the drain pipe to the sink. Use a rubber gasket to seal it tightly. This prevents leaks. Make sure the pipe is level. Adjust if needed. Hand-tighten the nuts. Avoid over-tightening them. This could crack the pipes.
Attaching The P-trap
Connect the P-Trap to the drain pipe. The P-Trap is U-shaped. It stops bad smells. Align it properly. Tighten the slip nuts by hand. Ensure it fits snugly. Check for any gaps or leaks.
Securing The Water Supply Lines
Attach water supply lines to the faucet. Use plumber’s tape for a secure fit. Wrap the tape around the threads. Connect the hot and cold lines. Hand-tighten the connections. Turn on the water slowly. Check for leaks. Tighten if necessary.
Sealing And Testing For Leaks
Make sure all pipes are connected tightly. Use a wrench to secure them. Apply plumber’s tape to each joint. This tape helps prevent leaks. After sealing, turn on the water. Watch carefully for any drips. Check under the sink for moisture. If you see any leaks, tighten the joints more. Sometimes a small leak can appear. In such cases, more tape might be needed. Repeat the process if necessary.
Once all is secure, let water run for a few minutes. This ensures everything is sealed. Observe the area around the pipes again. If no leaks appear, the job is complete. Your kitchen sink is now ready for use.
Troubleshooting Common Issues
Installing kitchen sink pipes often involves managing leaks and aligning connections. Ensure all fittings are tight and properly sealed. Always check for clogs and clean pipes regularly to maintain efficient drainage.
Leaky Pipes
Leaky pipes can cause a mess. First, check the pipe connections. Tighten them with a wrench. Be careful, don’t overtighten. Look for cracks or holes. Use plumber’s tape to fix small leaks. For bigger issues, replace the pipe.
Clogged Drains
A clogged drain can stop water flow. Pour hot water down the drain. This can break up clogs. Use a plunger for stubborn clogs. Press and pull the plunger several times. A drain snake can help for deep clogs. Insert and twist to clear the blockage.
Slow Water Flow
Slow water flow is annoying. Check the faucet aerator. It might be blocked. Remove and clean it. Use a brush and water. Look at the valves under the sink. Make sure they are fully open. This helps improve water flow.
Maintenance Tips
Check pipes regularly for leaks. Look for signs of water damage. Clean pipes to prevent clogs. Use a gentle brush or cloth. Inspect joints and connections. Tighten loose parts. Replace worn-out washers promptly. Use vinegar to remove mineral deposits. Ensure proper drainage under sink. Avoid harsh chemicals. They can damage pipes. Test water pressure often. Adjust if too high. Watch for unusual noises. They can indicate problems. Keep area under sink dry. Moisture causes mold. Store cleaning supplies nearby. They are handy for quick fixes.

Credit: www.reddit.com
Frequently Asked Questions
How Do I Start Installing Sink Pipes?
Begin by shutting off the water supply. Gather all necessary tools and materials. Ensure you have a clear workspace. Follow the manufacturer’s instructions for assembling the pipes. Test connections for leaks before restoring water flow. Proper planning ensures a successful installation.
What Tools Are Needed For Sink Pipe Installation?
You’ll need a wrench, pliers, pipe cutter, and plumber’s tape. A bucket is useful for catching water. Having these tools ready makes the installation smoother. Ensure tools are in good condition. Proper tools help avoid damage during installation.
Can I Install Sink Pipes Myself?
Yes, you can install sink pipes yourself. Follow detailed instructions and safety guidelines. Ensure you are comfortable with basic plumbing tasks. If unsure, consult a professional plumber. DIY installation can save money and improve skills.
How Long Does Sink Pipe Installation Take?
Installation typically takes 1 to 2 hours. Time may vary based on experience and complexity. Having all materials ready speeds up the process. Proper preparation helps avoid delays. Efficient installation ensures minimal disruption to your kitchen activities.
Conclusion
Installing kitchen sink pipes is simple with the right steps. Follow each instruction carefully. Ensure you have all tools ready before starting. Double-check each connection to prevent leaks. Tighten joints securely for stability. Clean your area after finishing. Test the water flow once done.
Fix any issues immediately for safety. Regular maintenance keeps pipes functioning well. Enjoy your kitchen without plumbing worries. With patience, your sink will be perfect. Your DIY skills will grow with practice. Happy plumbing!





